Beginner Artisan Sourdough bread: 4 Ingredients, Foolproof Method, Bakery-Quality Results (Step-by-Step)
If you've ever stood in a bakery, stared at a beautiful rustic loaf with that crackly crust and open, bubbly crumb, and thought "I could never make that" — this recipe is here to prove you wrong.
Because here's the thing: real sourdough bread only needs four ingredients. Flour, water, salt, and a little levain — a wild starter made from nothing more than flour, water, and the natural bacteria floating around your kitchen. That's it. No store-bought yeast, no fancy equipment, no culinary degree required.
Yes, this recipe takes anywhere from one to three days from start to finish. But don't let that scare you — most of that time the dough is simply resting while you go about your life. The actual hands-on work is surprisingly simple, and the payoff? A golden, crackling sourdough boule with a wild, open crumb that looks like it came straight out of an artisan bakery.
You've got this. Let's bake.
As an Amazon Associate I earn from qualifying purchases.
*Last Updated: February 24, 2026
⭐⭐⭐⭐⭐ (4.9/4 based on taste tester reviews)
📖 Jump to Recipe | 💬 Jump to FAQs | 🖨️ Print Recipe
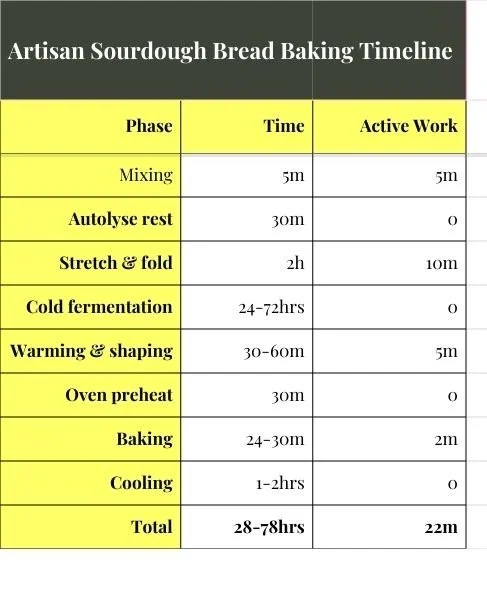
Active Time: 20 minutes | Fermentation: 24-72 hours | Bake: 25 minutes | Yield: 1 loaf | Difficulty: Easy
Why I Make homemade Artisan sourdough bread
It started with a grocery store bread label. The ingredient list was long, most words I couldn't pronounce, and that didn't sit right with me. I wanted to broadly know what was going into the food I feed my family — and I knew I could do better, so I got to work!
My sister-in-law introduced me to sourdough, gifted me part of her sourdough starter, a gift that I’m thankful for! Over the next six months, I tested and tweaked everything: different flours (all-purpose, whole wheat, spelt, millet, and blends), resting times, oven temperatures, and shaping methods. What I discovered is that great sourdough isn't about one secret ingredient — it's about getting a handful of small details right, together.
For example, a 48-hour rest period produces a much more flavourful loaf than 24 hours, but go beyond 72 hours and it's too much. These little things matter, and once you understand them, you'll feel the difference in every loaf.
How do I make artisan sourdough bread at home? What I landed with was the perfect sourdough bread boule recipe that has just 4 simple ingredients: flour, salt, water, and levin (which is a mix of flour, water and bacteria that was floating in the air and captured in the flour/water mixture).
I’ve been making this recipe on a weekly basis since and it's become our go-to alongside a warm bowl of soup. I hope it becomes a staple in your home too.
Perfect for: weekend baking, meal prep, brunch, or gifting
Why this recipe works:
No special equipment required (find out more in the FAQs)
Cold fermentation builds incredible flavour (traditional method!)
Just 4 ingredients (yay!)
Easily double or triple this recipe, freeze the extras. Prep once, enjoy for weeks to come! (saves time)
20 minutes active time (fits most schedules)
Freezer-friendly (make ahead for weeks of breakfasts)
Detailed photos and troubleshooting (foolproof results)
How Can I Make Sourdough Bread at Home?
This beginner-friendly artisan sourdough bread recipe needs just 4 ingredients and uses a simple no-knead method. With 20 minutes of active work and 1-3 days of hands-off fermentation, you'll create bakery-quality artisan bread with a crispy crust and tangy, chewy interior.
What You'll Need to Make Sourdough Bread
Ingredients (4 Simple Ingredients)
315g cold water (1⅓ cups)
200g active sourdough starter (¾ cup) - bubbly and fed within 4-12 hours
450g all-purpose flour (3½ cups)
12g kosher salt (2 teaspoons)
Total dough weight: ~977g (roughly 2.2 lbs)
Equipment Needed
Large mixing bowl (metal or ceramic preferred)
Fork, for mixing
Cotton kitchen towel or plastic wrap
Kitchen scale (Affiliate link) (highly recommended)
Cast iron Dutch oven with lid (5-7 quart)
Parchment paper
Bread lame, razor blade, very sharp knife or a pair of kitchen shears
Wire cooling rack (Affiliate link)
Instant-read thermometer (optional but helpful)
How Long Does It Take to Make Sourdough Bread?
Best schedule: Mix Thursday evening → Bake Saturday morning and enjoy over the weekend, or week ahead!
Step-by-Step Sourdough Bread Instructions
Step 1: Mix the Dough (5 minutes)
In a large mixing bowl, combine the cold water and active sourdough starter. Stir with a fork until mostly dissolved (some clumps are fine).
Add the flour and salt. Stir together with the fork until well incorporated and no dry flour remains. The dough will look shaggy, rough, and sticky—this is exactly what you want.
Pro tip: Don't over-mix. Just ensure all flour is hydrated. The dough develops through time, not mixing.
What does "active starter" mean? Your starter should have been fed 4-12 hours ago, doubled in size, and be full of bubbles. It should pass the float test (a spoonful floats in water).
Step 2: Autolyse Rest (30 minutes)
Cover the bowl with a damp cotton towel or plastic wrap. Let the dough rest at room temperature for 30 minutes undisturbed.
Why autolyse? This rest period allows the flour to fully hydrate and begins gluten development naturally, making your dough easier to work with.
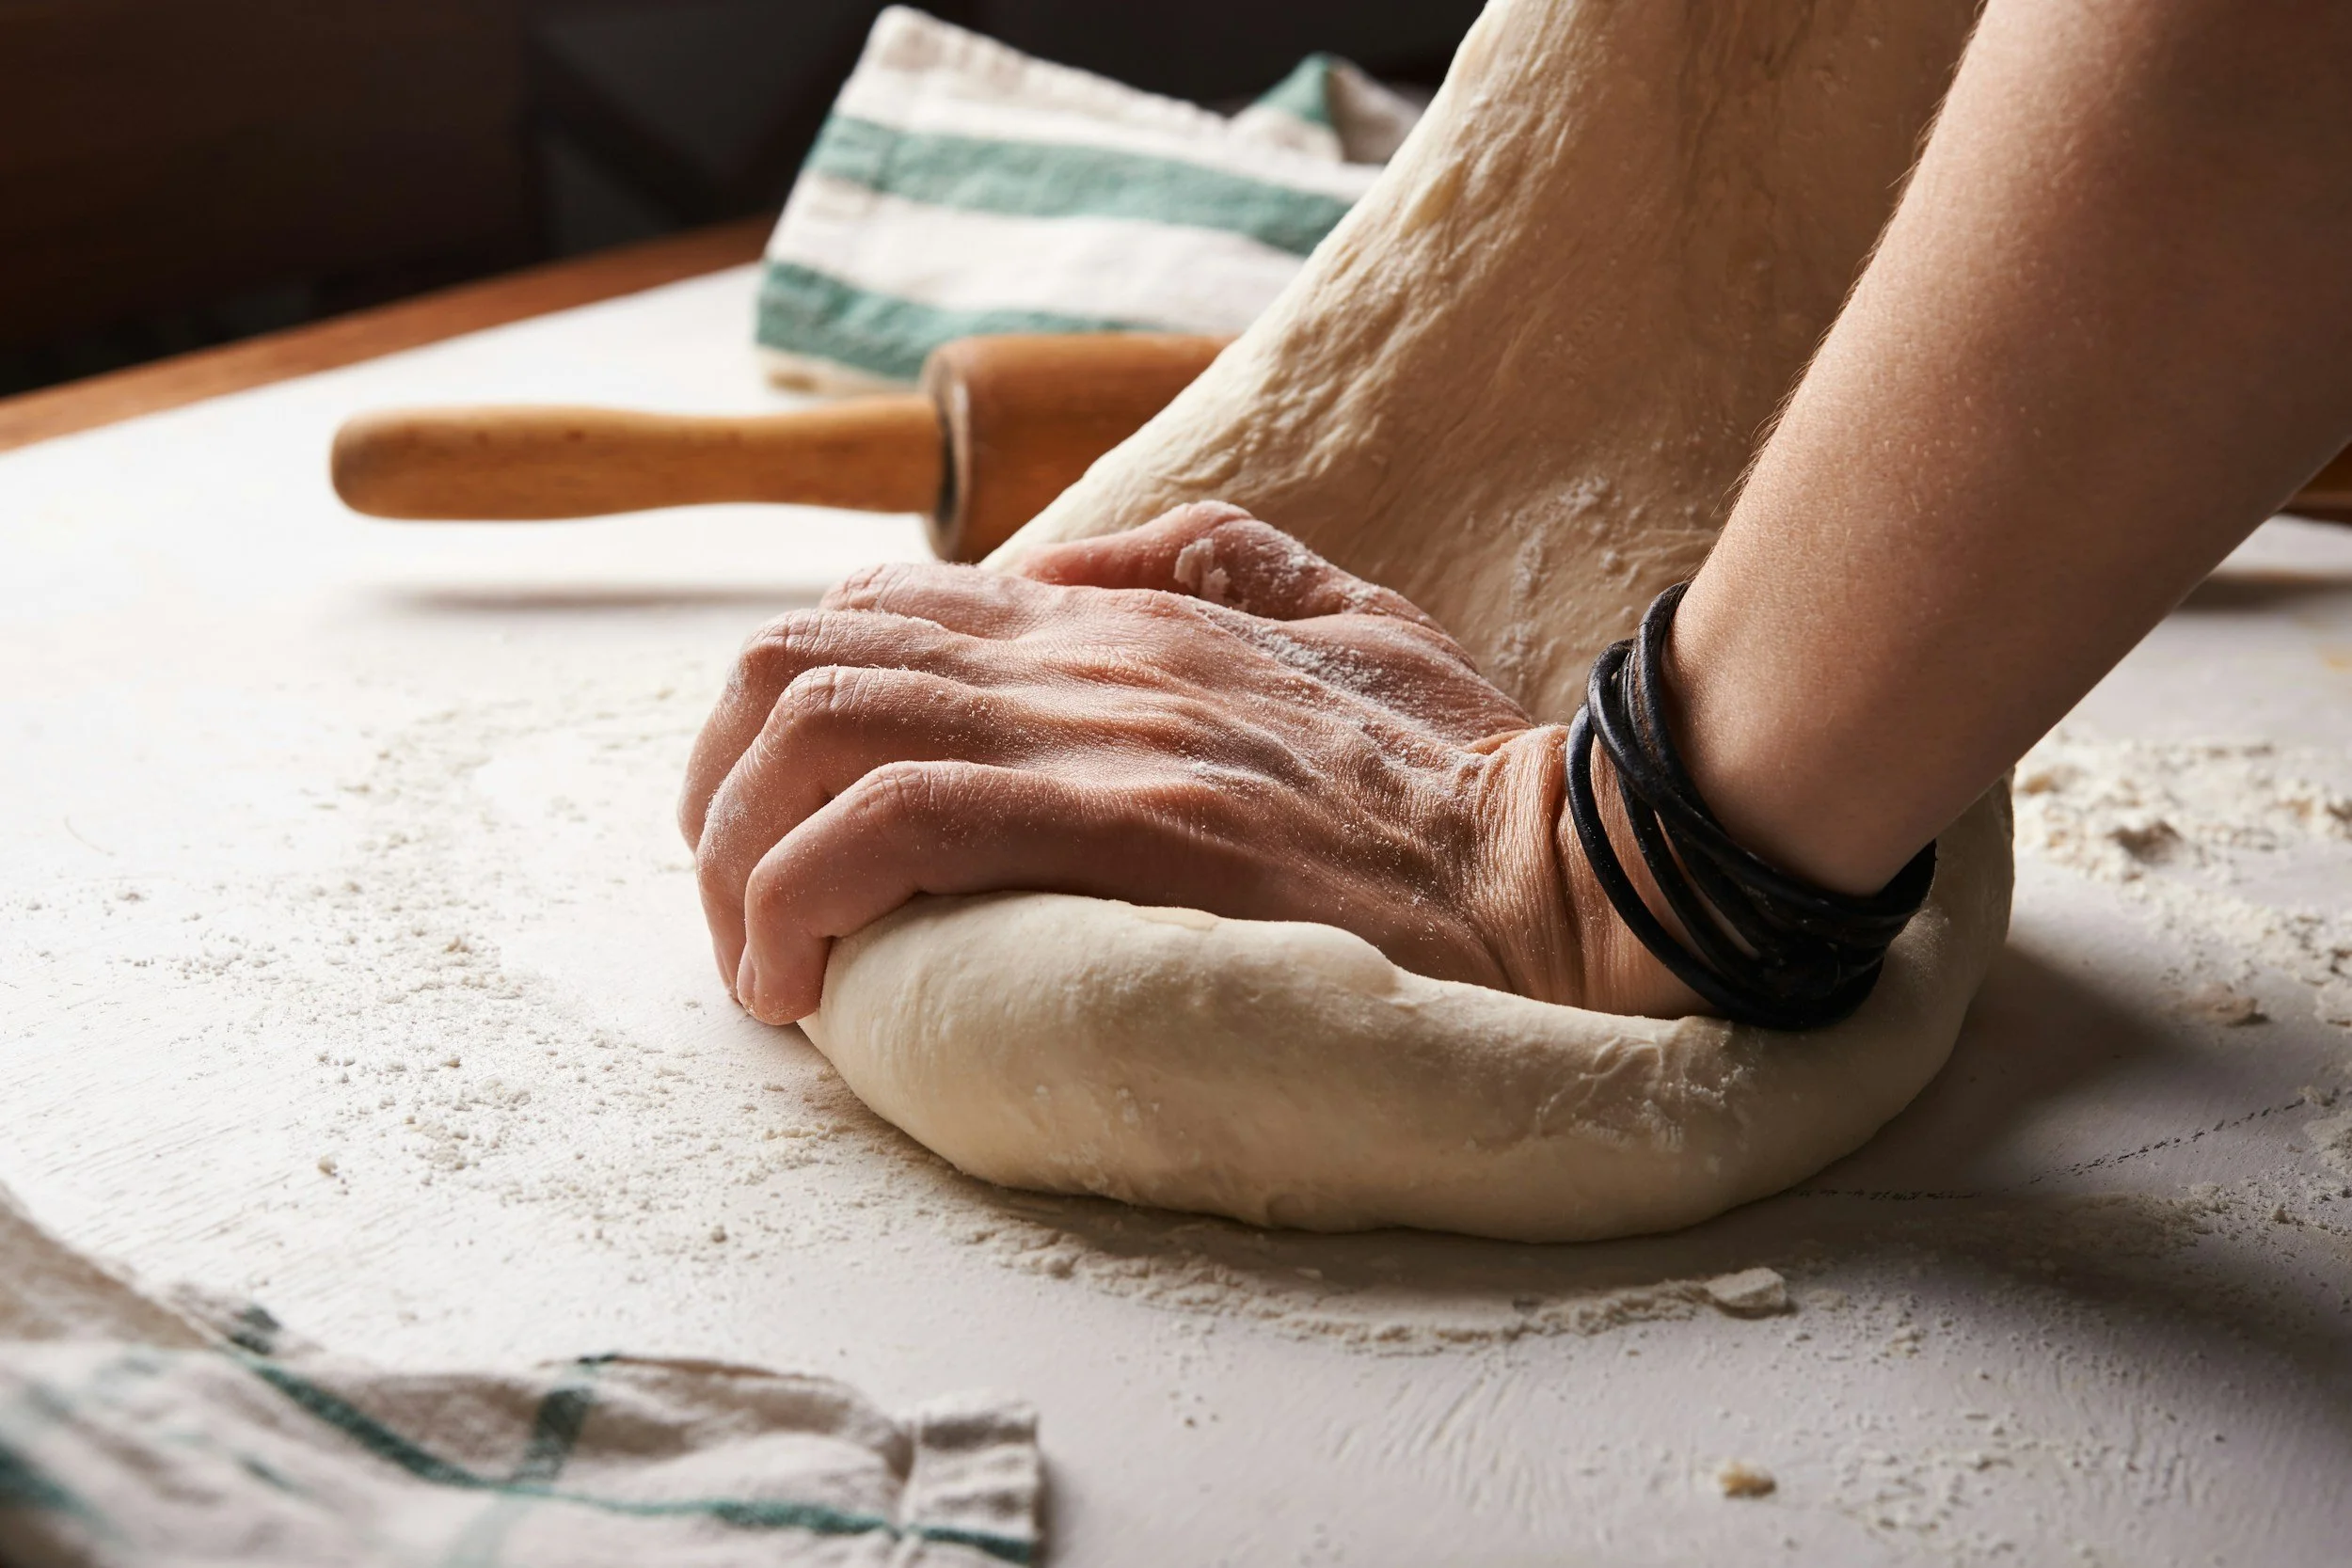
Step 3: Stretch and Fold (1.5-2 hours)
After the 30-minute rest, perform your first set of stretch and folds:
Wet your hands with water to prevent sticking
Grab the dough from one side (north position)
Stretch it upward until you feel resistance
Fold it over to the opposite side (south position)
Rotate the bowl 90 degrees
Repeat 4-6 times around the entire bowl
Repeat this process 3-4 times total, with 30-minute rests between each round:
First set: immediately after autolyse
Second set: 30 minutes later
Third set: 30 minutes later
Fourth set (optional): 30 minutes later
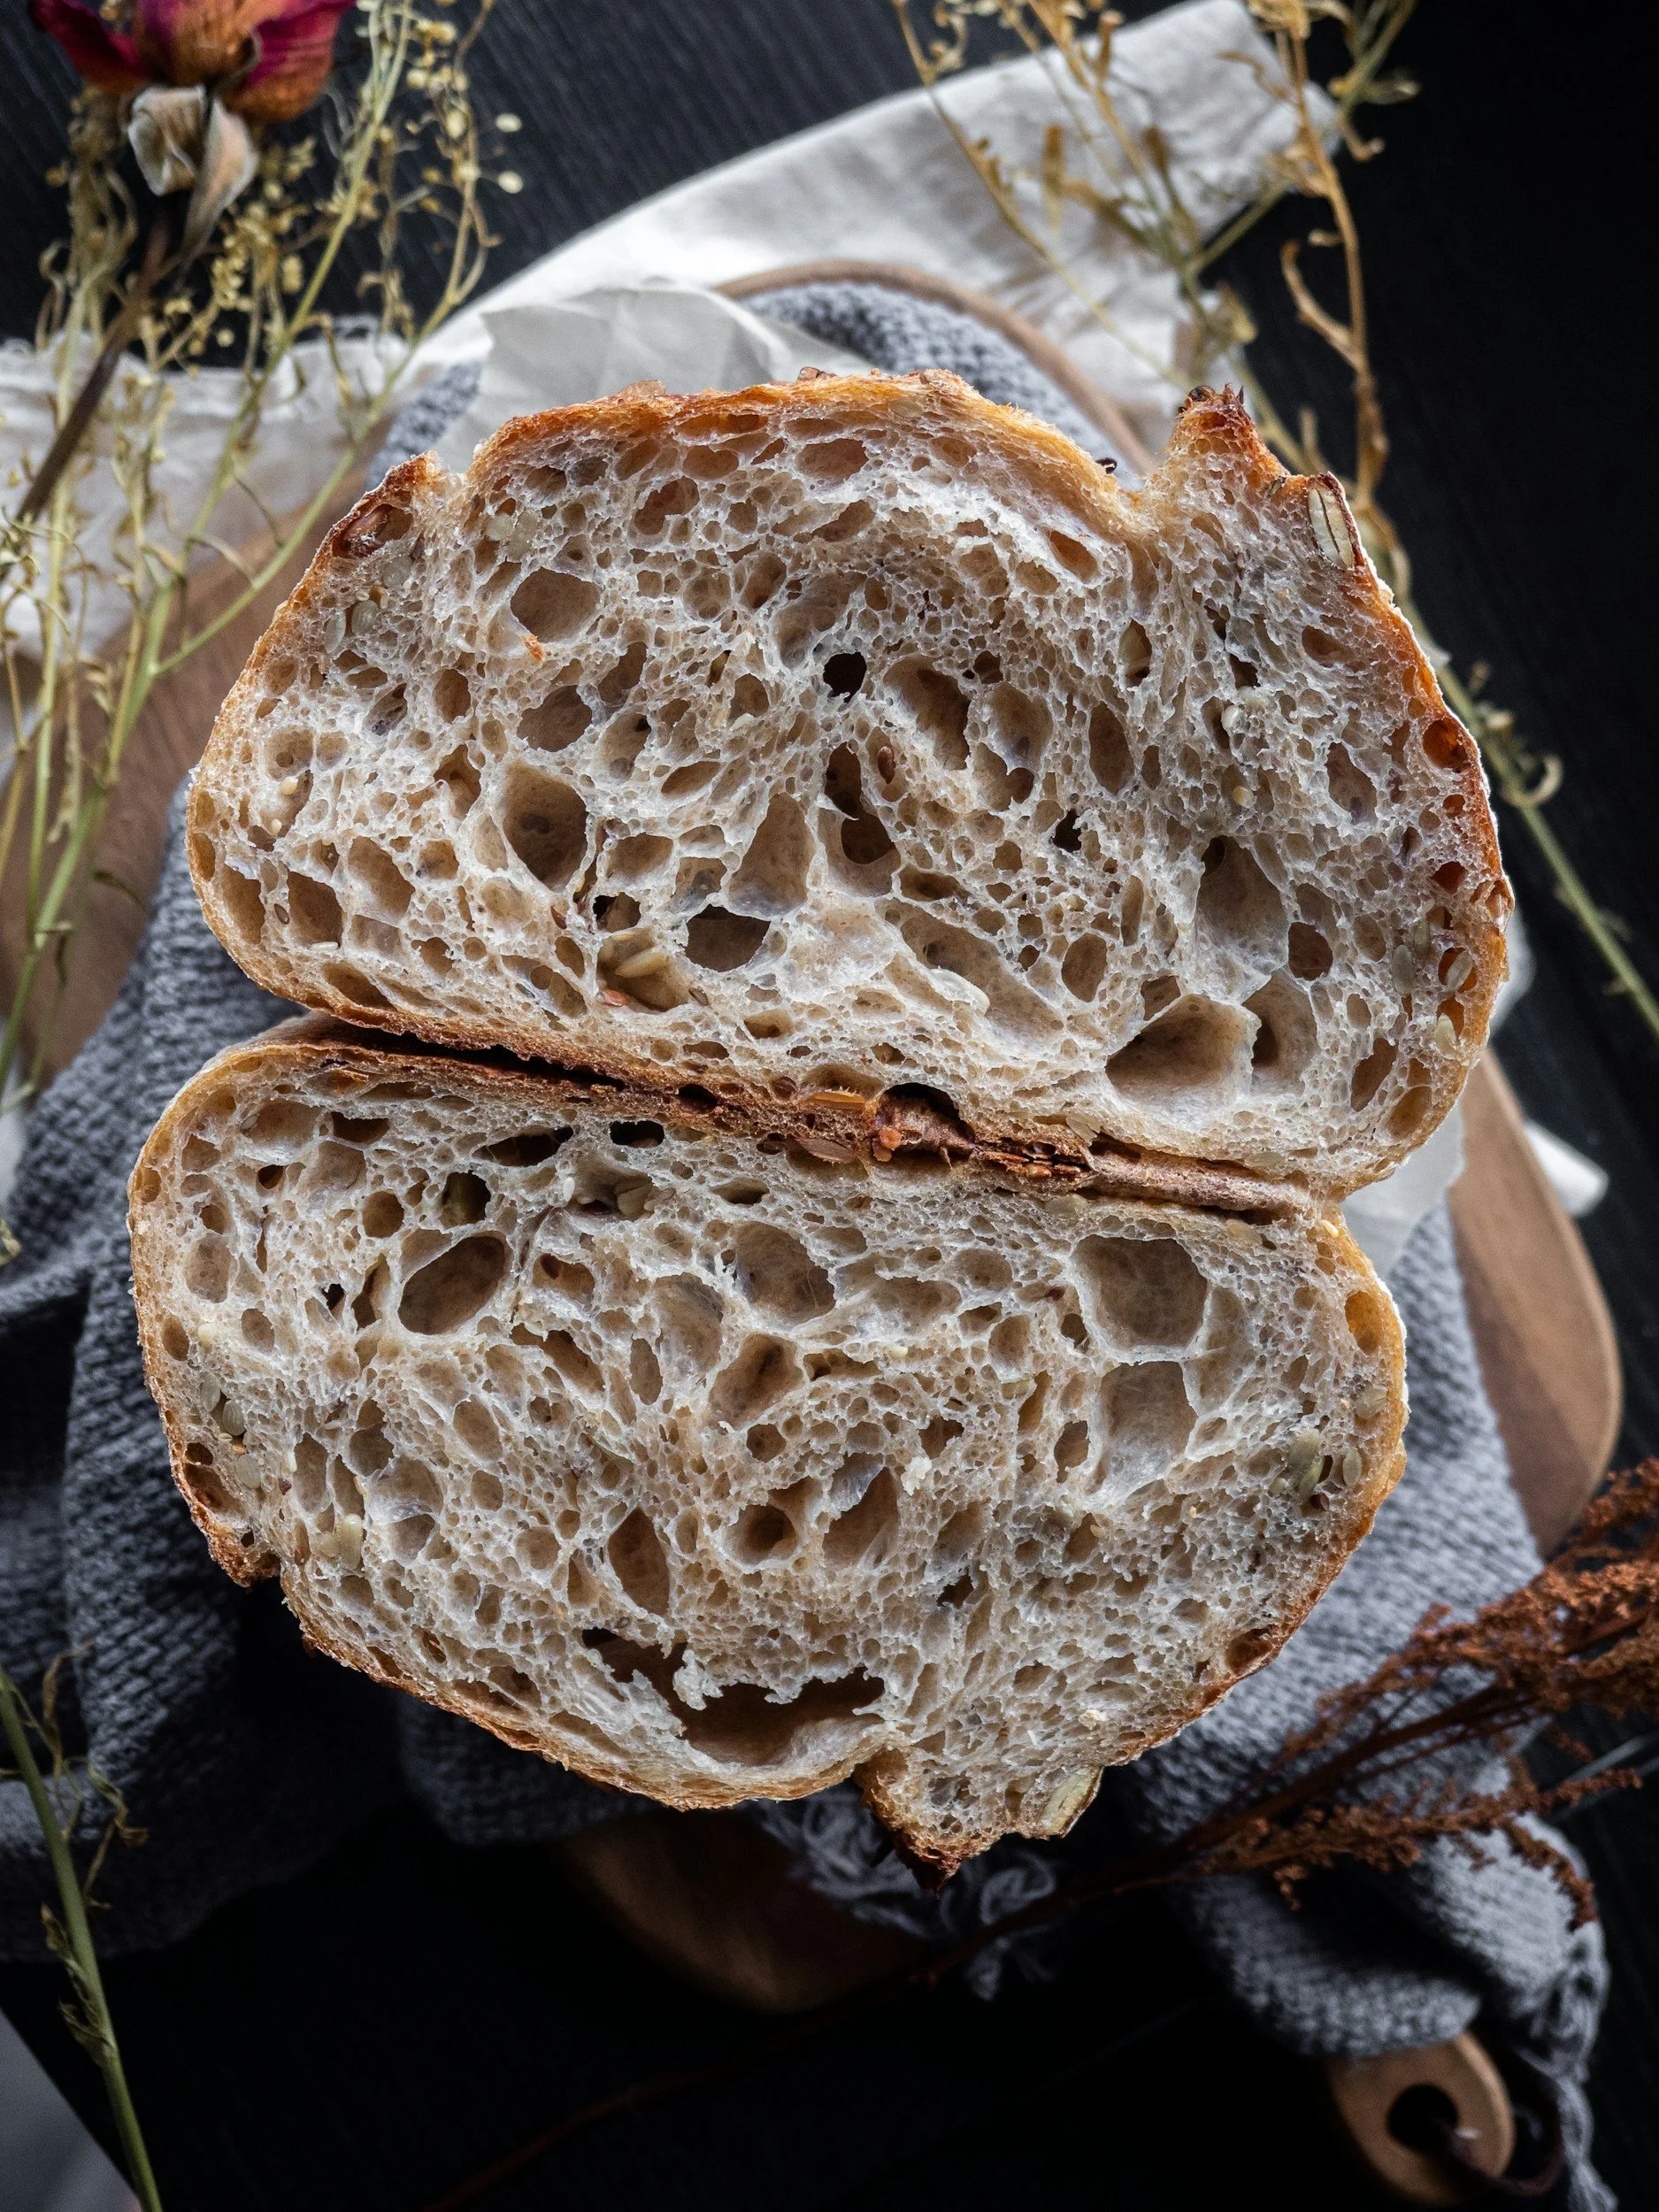
What you'll notice: With each round, the dough becomes smoother, more elastic, and holds its shape better. You're building gluten strength and trapping air bubbles.
Common mistake: Don't deflate the dough or fold too aggressively. Gentle stretching preserves the bubbles.
Step 4: Shape the Dough (5 minutes)
After your final stretch and fold, lightly flour your work surface. Turn the dough out onto the counter.
Shape into a boule:
1. Gently pull the edges of the dough toward the center, rotating as you go
2. Flip the dough over so the seam is on the bottom
3. Using your hands, gently rotate and pull the dough toward you to create surface tension
4. The top should be smooth and taut
Return the shaped dough to a clean bowl, seam-side up or down (your preference).
Why shape now? Pre-shaping before cold fermentation gives better structure and a higher rise.
Step 5: Cold Fermentation (24-72 hours)
Cover the bowl tightly with plastic wrap or a cotton cloth and place in the refrigerator.
Fermentation timeline:
- 24 hours: Mild tang, open crumb, good for beginners
- 48 hours: Balanced sour flavor, best all-around (recommended)
- 72 hours: Maximum tang, denser crumb, deeper flavour
What's happening: The cold temperature slows yeast activity but allows beneficial bacteria to develop complex flavours. This is what makes sourdough taste like sourdough.
Can I go longer than 72 hours? Yes, up to 5 days is safe, but the flavor becomes increasingly sour and the dough may become more difficult to work with.
Why the Long Fermentation Matters:
The 24-48 hour cold fermentation isn't just for flavour - it actually transforms the bread:
Breaks down gluten: Makes bagels easier to digest
Develops organic acids: Creates that characteristic sourdough tang
Improves texture: Longer fermentation = better crumb structure
Enhances nutrition: Makes minerals more bioavailable
Natural preservation: Sourdough naturally stays fresh longer
Step 6: Warm to Room Temperature (30-60 minutes)
Remove the dough from the refrigerator. Let it sit at room temperature while you preheat the oven (about 30-60 minutes).
Temperature matters: Cold dough won't rise properly in the oven. Room temp dough (65-70°F) gives the best oven spring.
Step 7: Preheat Oven and Dutch Oven (30 minutes)
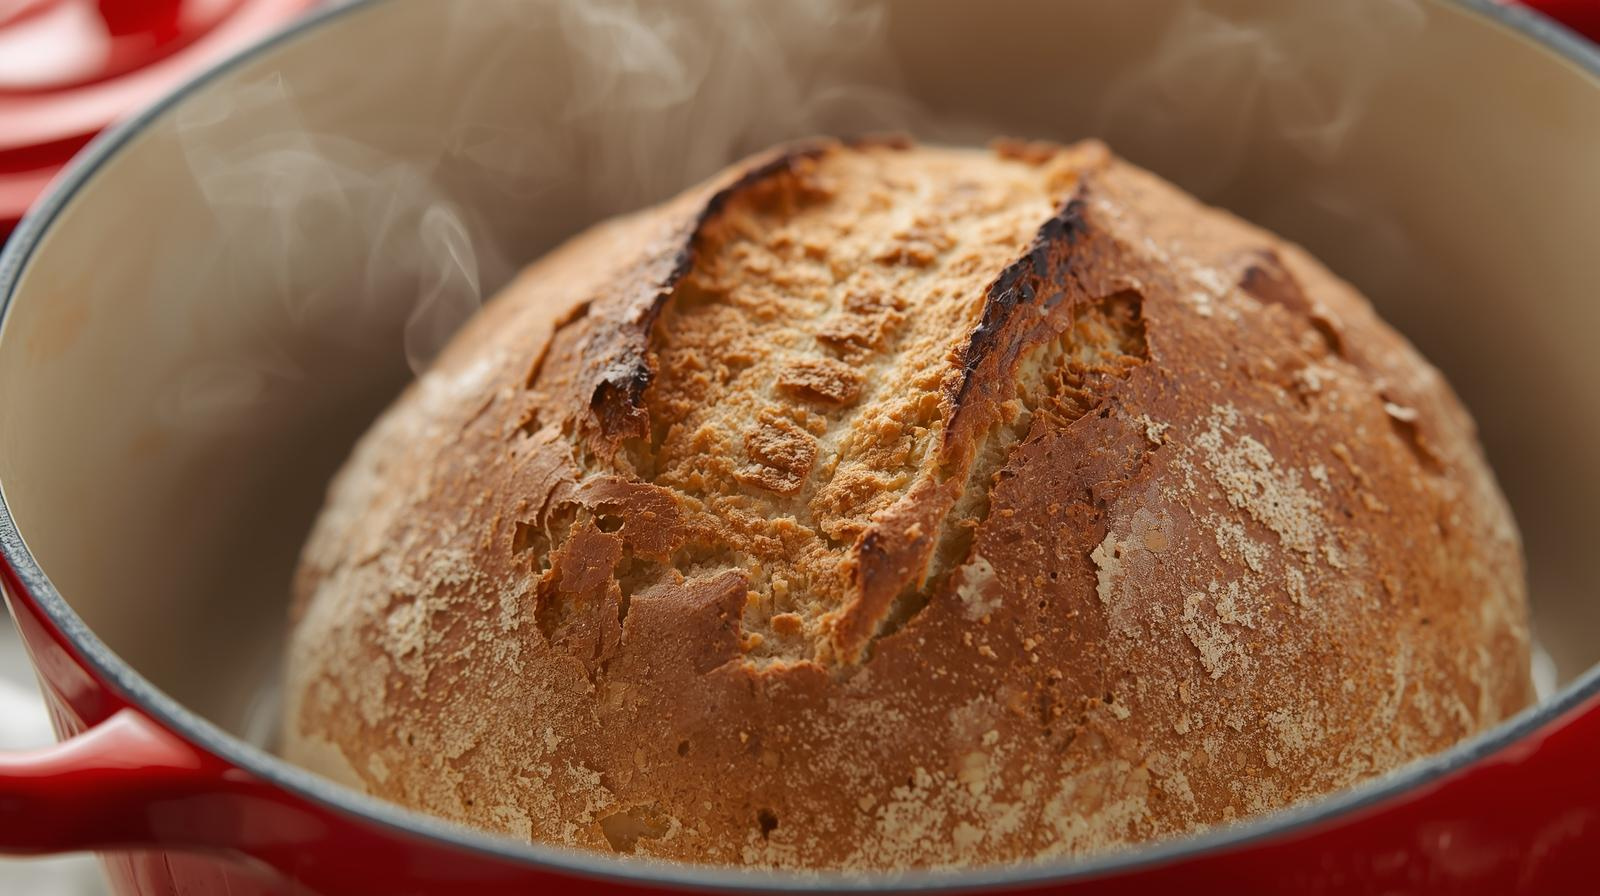
Place your empty cast iron Dutch oven (with lid on) in the oven. Preheat to 450°F (232°C).
Critical: Preheat for a minimum of 30 minutes, preferably 40 minutes. The Dutch oven needs to be scorching hot to allow the dough to bake in steam.
Safety tip: ALWAYS USE OVEN MITTS rated for at least 500°F. The Dutch oven will be extremely hot.
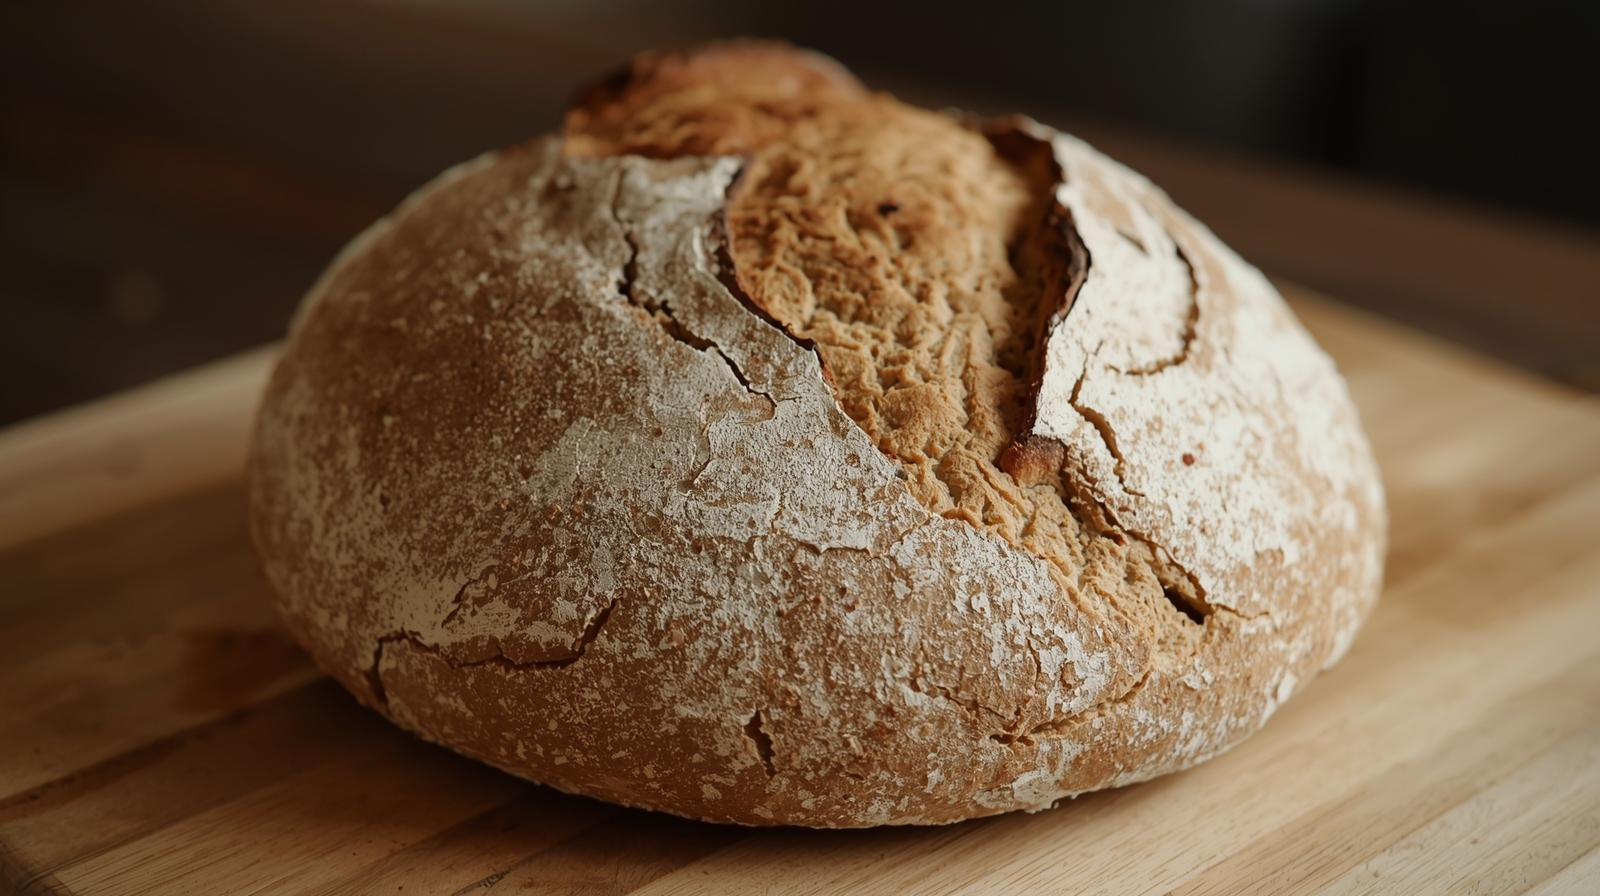
Step 8: Score the Dough (2 minutes)
While the oven preheats, prepare your dough:
1. Cut a piece of parchment paper slightly larger than your dough
2. Gently turn the dough out onto the parchment, seam-side down
3. Using a bread lame, sharp knife or pair of kitchen shears, score the top with 1-2 deep cuts (about ½ inch deep and at a 45-degree angle)
Classic scoring patterns:
Single long slash (traditional)
Cross pattern (rustic)
Decorative patterns such as leaves, squares, or other (decorative)
Why score? Scoring controls where the bread expands during baking.
Step 9: Bake Your Sourdough (24-30 minutes)
Using heavy-duty oven mitts, carefully remove the preheated Dutch oven from the oven.
Remove the lid. Using the parchment paper as a sling, lift the dough and lower it into the Dutch oven. Put the lid back on immediately to trap steam.
Baking timeline: 24 minutes covered at 450°F for golden crust
How do you know it's done?
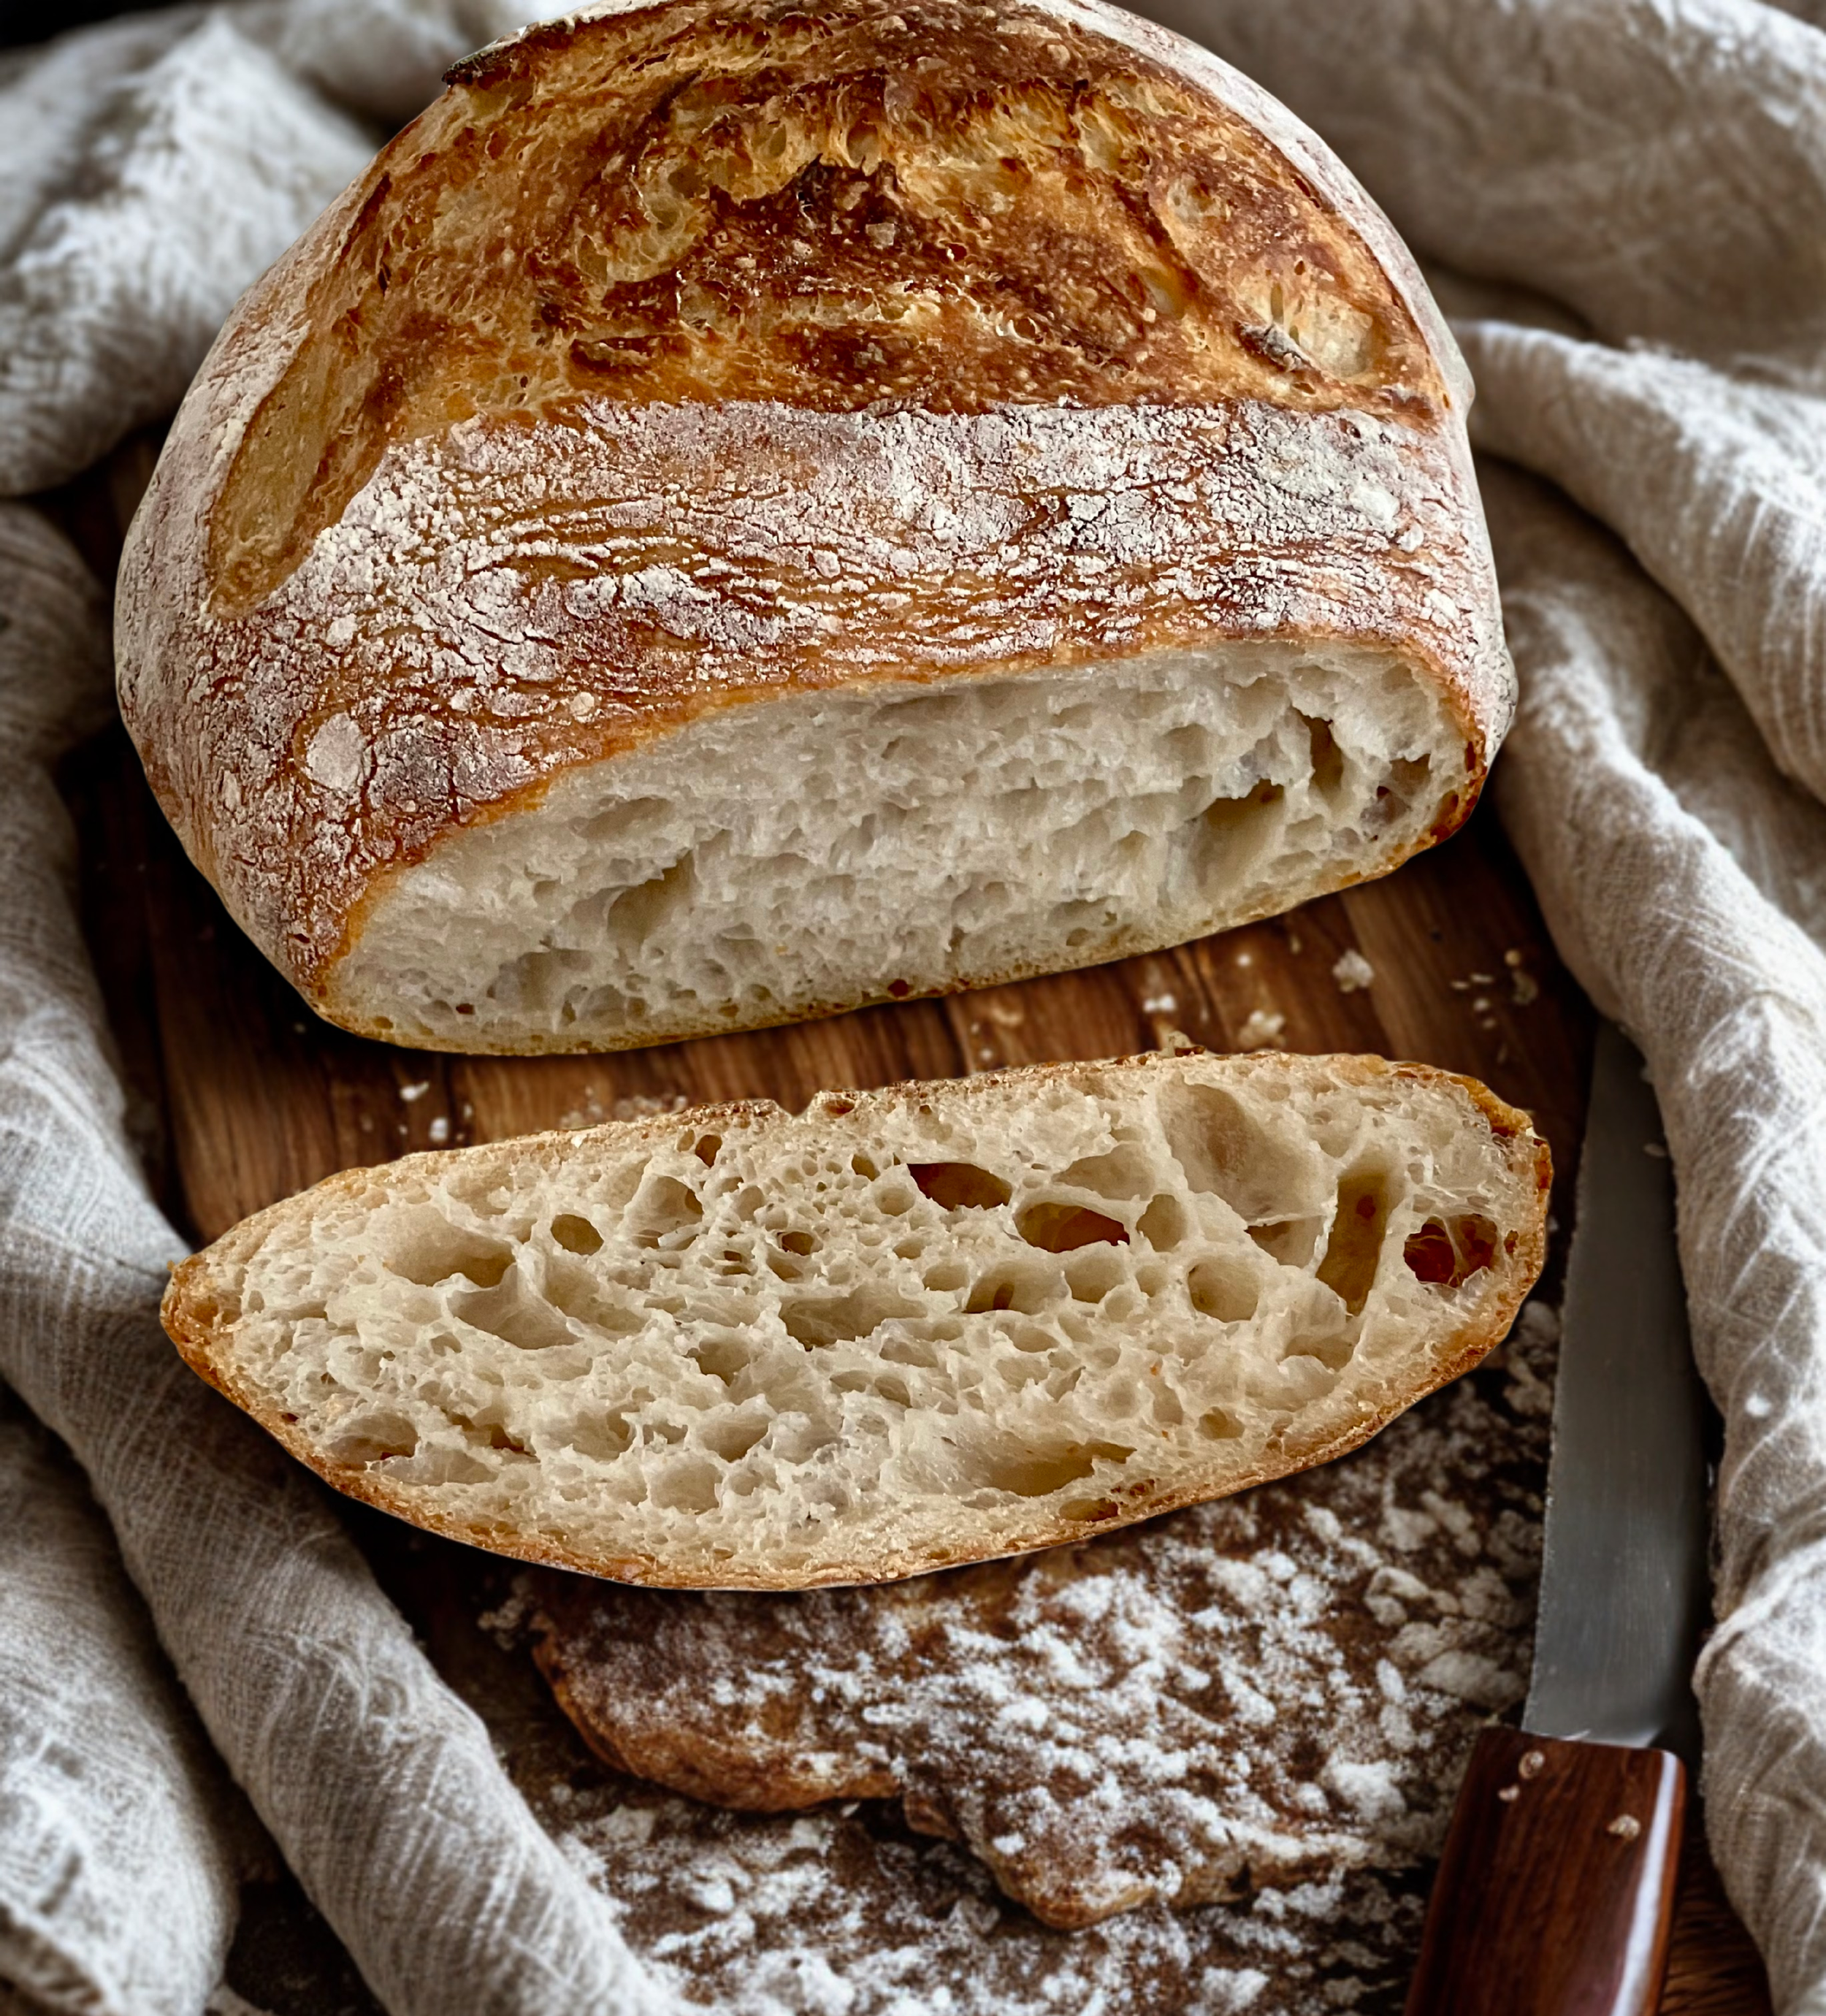
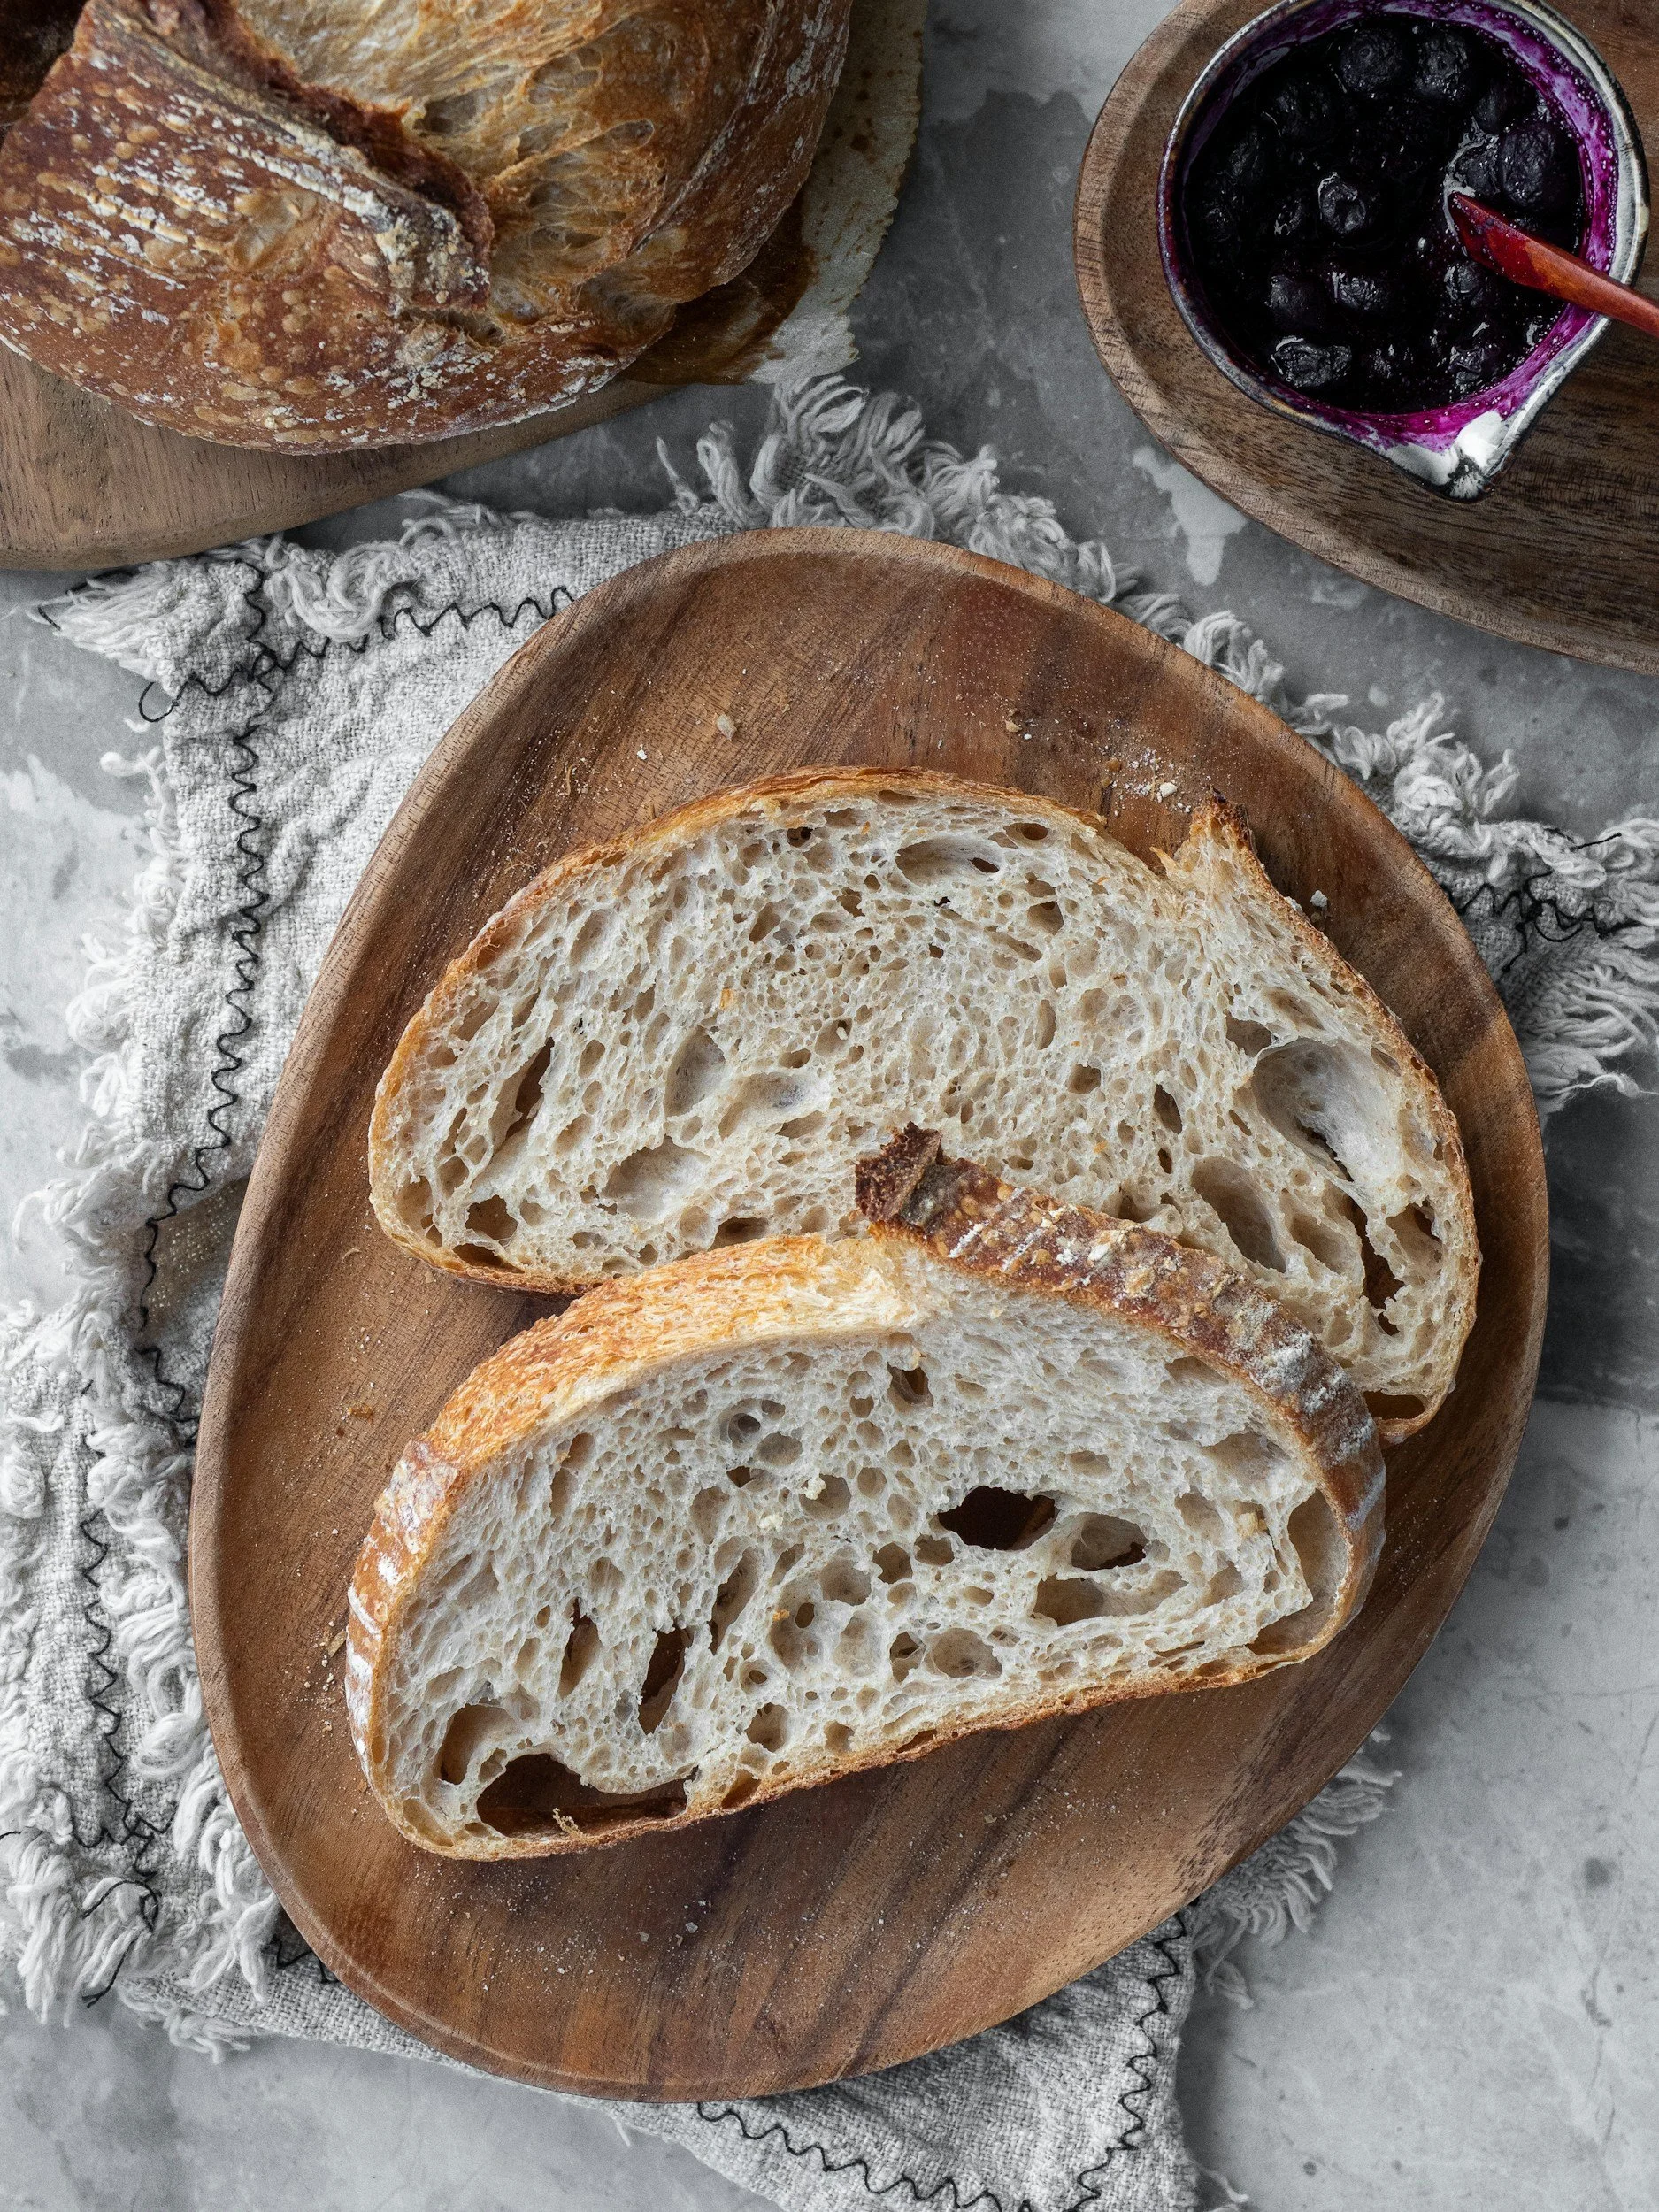
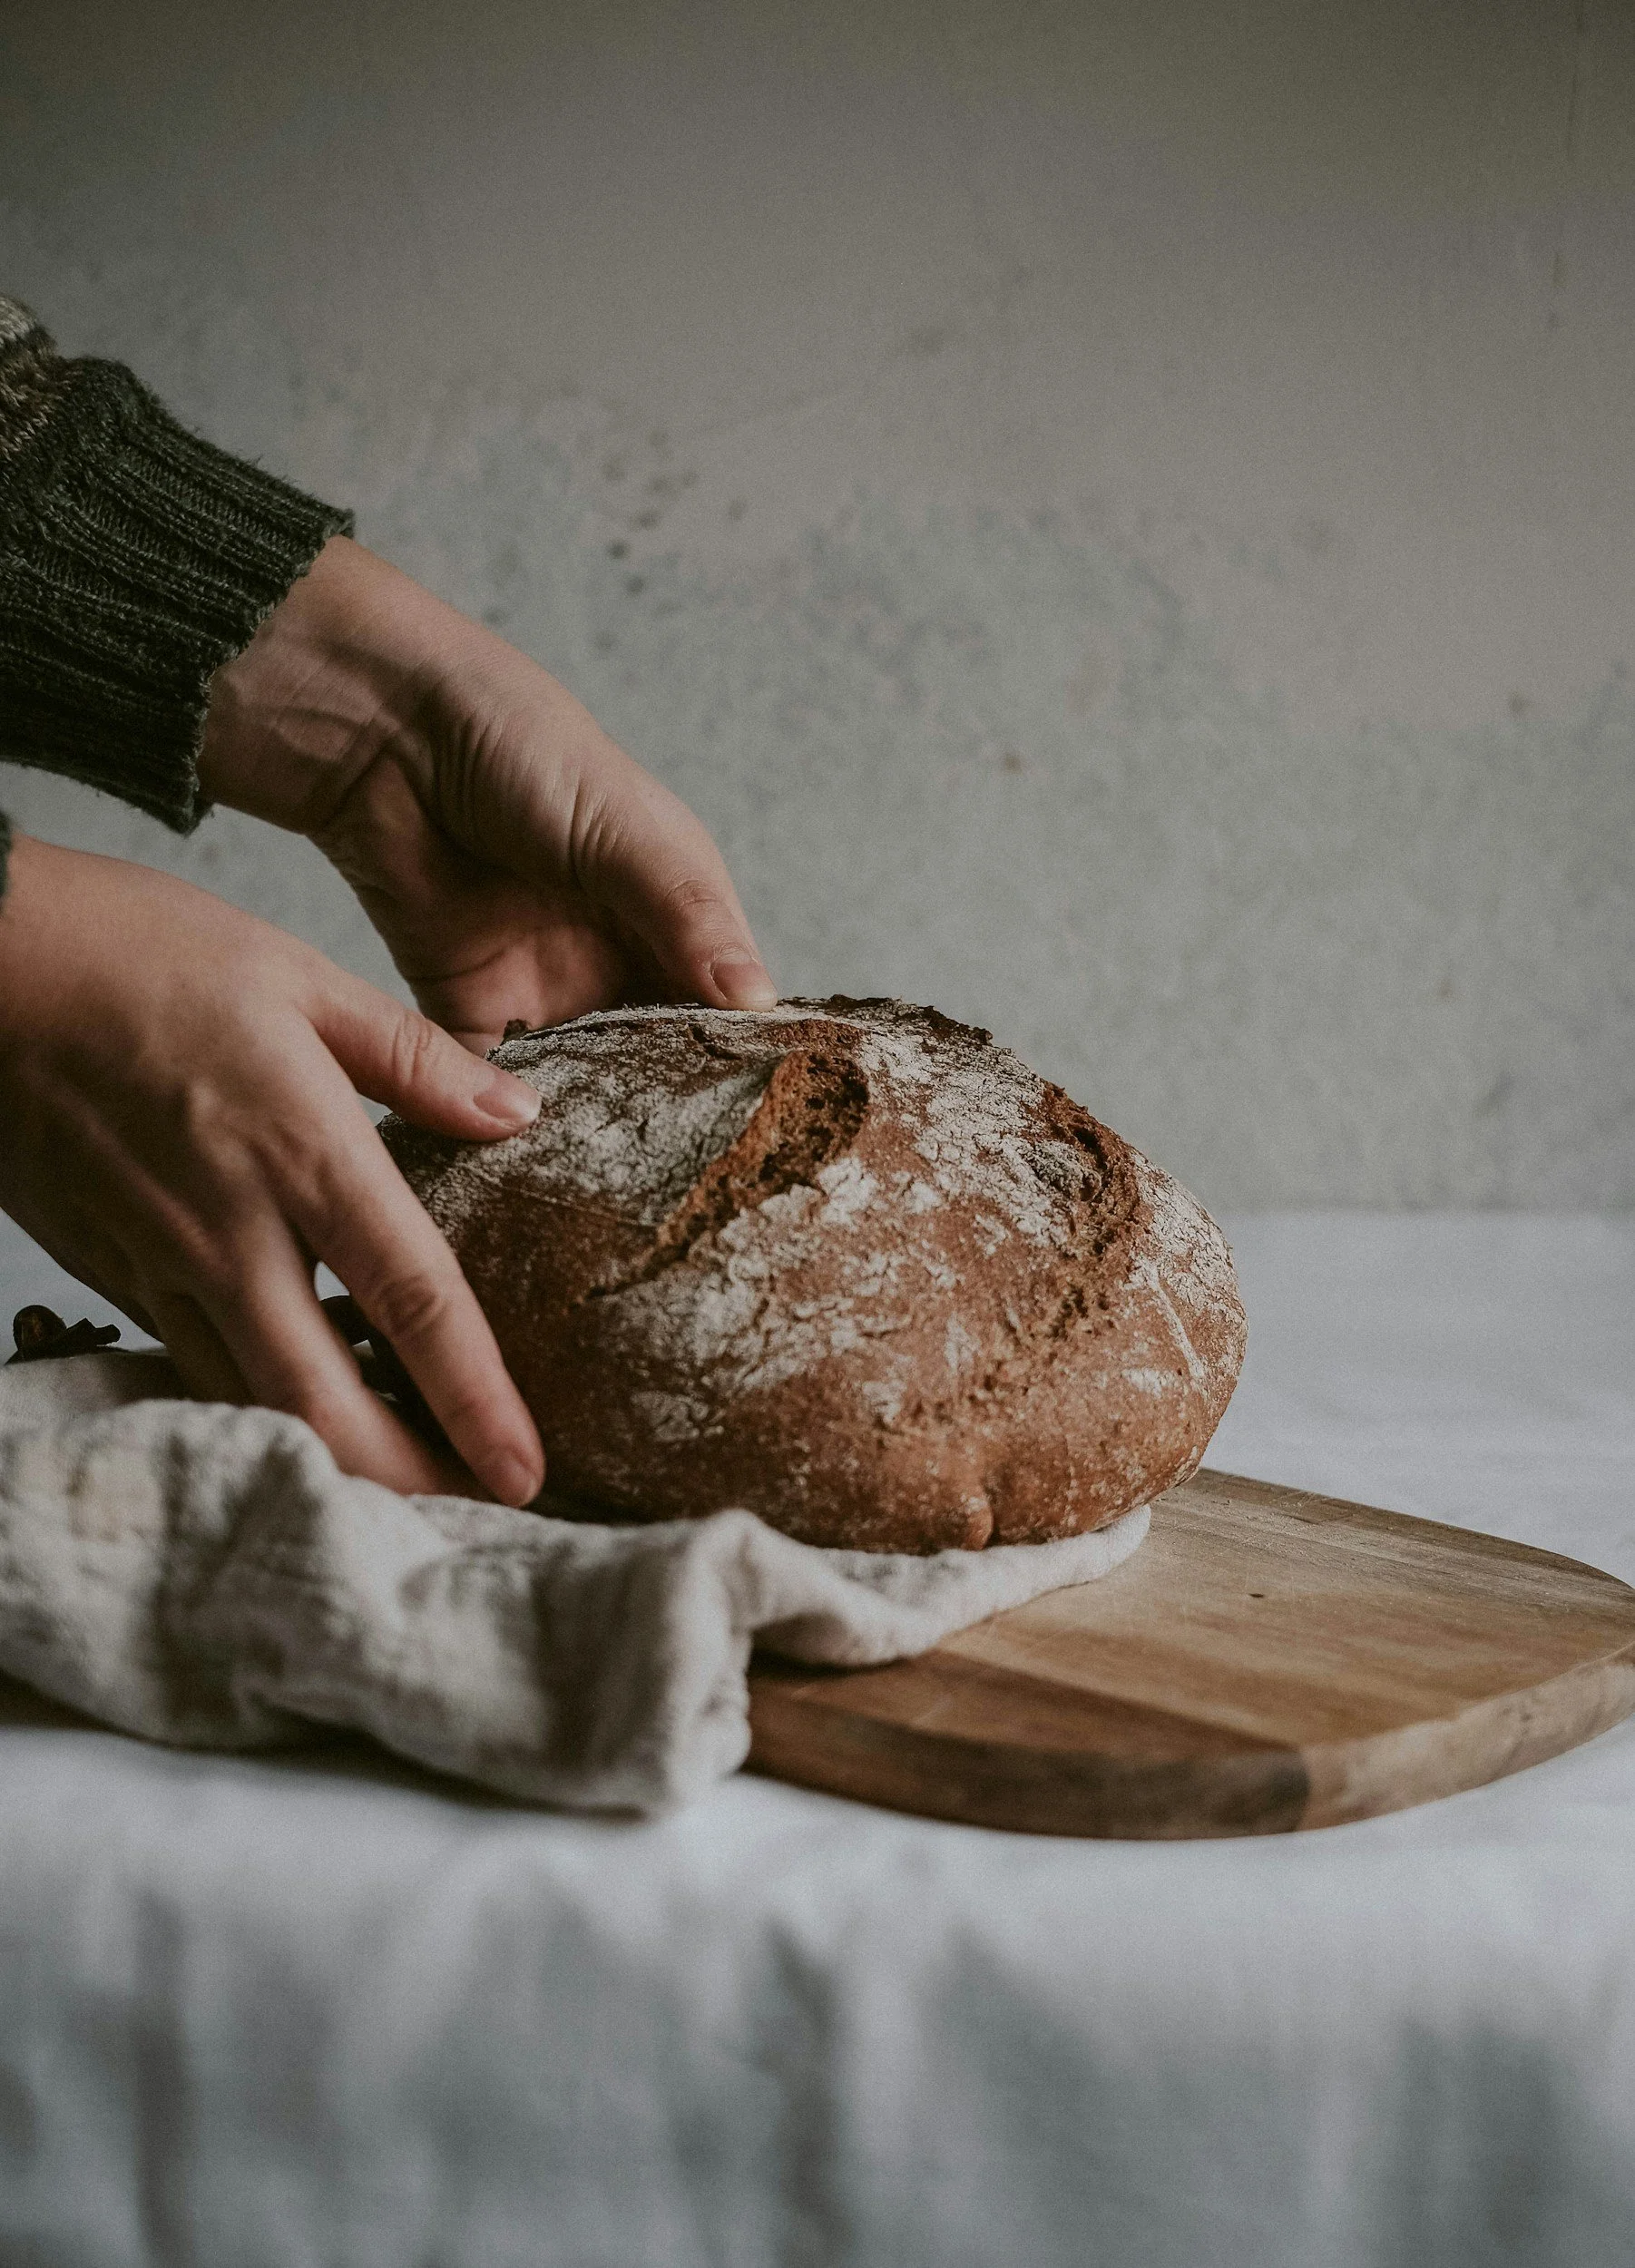
You’ll first notice that the loaf will have expanded, and almost doubled in size, and the score mark will have greatly expanded. It’ll be evident!
Next, you’ll see the deep golden-brown crust
Once the dutch oven will have been removed from the oven and the bread have cooled on the cooling rack, you'll notice a hollow sound when tapped gently on the bottom
Step 10: Cool Completely (1-2 hours)
Remove the bread from the Dutch oven immediately (it can become soggy if left in).
Place on a wire cooling rack and resist the urge to slice for at least 1 hour, preferably 2 hours.
Why wait? The interior crumb continues to set as it cools. Cutting too early results in gummy, doughy bread.
Listen for the "song": As your bread cools, you'll hear crackling sounds from the crust. This is the sound of success!
Tips for Perfect Homemade Artisan Sourdough Bread
🥯 Use Active Starter: Your starter MUST be bubbly and active. If it's sluggish, your bread won't rise. Feed your starter 4-12 hours before mixing dough and make sure it passes the float test.
⚖️ Weigh Your Ingredients: Use a kitchen scale (affiliate link) for accuracy. Flour measurements can vary by 30g or more depending on how you scoop, which drastically affects dough consistency.
❄️ Cold Fermentation is Key: Don't rush this step! The 24-72 hour cold ferment develops flavour and improves texture. It's what makes these bagels special.
🌡️ Accurate Oven Temp: Use an oven thermometer. If your oven runs hot or cold, your bread will overbake or underbake.
📝 Keep Notes: Write down fermentation times and temperatures. Sourdough timing varies with kitchen temp and starter strength.
🧊 Freeze for Later: These freeze beautifully! Slice before freezing for easy toasting straight from frozen.
Frequently Asked Questions (FAQs)
How do I know if my sourdough starter is ready to use?
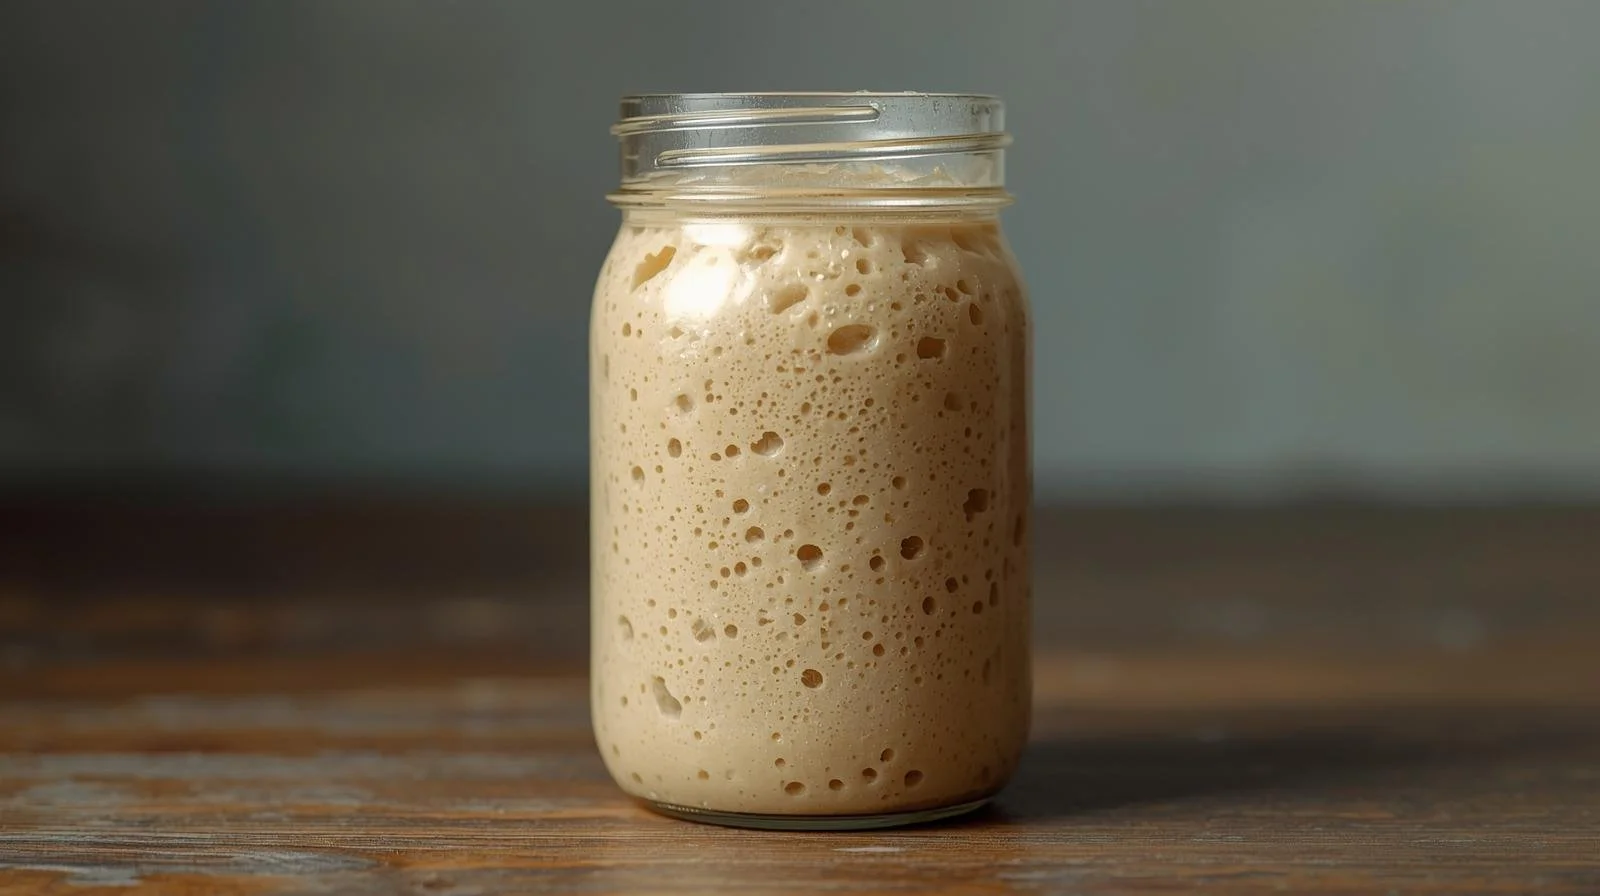
Your starter is ready when it has doubled in size within 4-12 hours of feeding, is full of bubbles, and passes the float test. To test: drop a teaspoon of starter into a glass of water. If it floats, it's ready.
You’ll also notice that once it’s been fed, it will double or triple in size in the following 4-12 hours. If it hasn’t been fed in quite a while, it might not double in size. If this is the case, and you have a a few days to strengthen it, feed it equal parts flour and water (for example, 50g starter would then be fed 50g flour + 50 g water) every 24 hours, for the next 2-3 days. This will strengthen the sourdough starter. A strong started should double or triple in size 4-12 hours after feeding. This is what gives you those big airy bubbles that are synonymous with sourdough bread.
What if my sourdough starter isn't bubbly?
Your starter needs to be fed and active before baking. If it's flat or inactive, feed it equal parts flour and water (e.g., if you have 50g starter, mix in 50g of flour and 50g of water), and wait 4-12 hours until it doubles and becomes bubbly. If your sourdough starter hasn’t been fed in a while it might not rise to double or tripling in size. You might only have tiny bubbles and your starter might only rise slightly. If this is the case, then I recommend that you leave it at room temperature (lots of people keep it on their kitchen counter), and take a few days to strengthen it by feed it equal parts flour and water (for example, 50g starter would then be fed 50g flour + 50 g water) every 24 hours, for the next 2-3 days. This will strengthen the sourdough starter. A strong healthy starter that can double or triple in size, will be strong enough to produce bread with those big airy bubbles that are synonymous with sourdough bread.
Can I use discard starter instead of active starter?
Not recommended. This sourdough bread boule needs the leavening power of active starter to rise properly.
Why active starter is better:
Contains live, active yeast
Provides leavening power
Creates better texture
Develops proper flavour
Why is my sourdough bread dense and not airy?
Dense sourdough typically results from:
Inactive starter: Make sure it passes the float test
Under-fermentation: Dough needs adequate time to rise
Insufficient gluten development: Don't skip the stretch and folds
Cutting too soon: Let bread cool completely
How do I know when sourdough bread is fully baked?
Three ways to check:
Color: Deep golden-brown crust (darker than you think)
Sound: Hollow thump when tapped on the bottom
Temperature: Internal temp of 200-210°F on instant-read thermometer
Can I bake sourdough without a Dutch oven?
Yes, but the Dutch oven gives the best results by trapping steam. Here are some alternatives that could work. Make sure they’re oven safe to 450F before using:
Baking stone or steel with a pan of boiling water on the bottom rack
Inverted roasting pan over the loaf for the first 20 minutes
Heavy-duty baking sheet (results will be less dramatic)
How should I store sourdough bread?
Room Temperature Storage
Best for: Eating within 2-3 days
Store in:
Paper bag or bread box (allows some air circulation)
Loosely closed plastic bag (do NOT seal tight)
Don't store in: Airtight container at room temp (creates moisture and makes the bread soggy. This environment also favours mold development)
Shelf life: 2-3 days at room temperature
Refrigerator Storage
Best for: Extending freshness to 5-7 days
Store in:
Airtight container or sealed plastic bag
Slice first for easy toasting
Downsides:
Can make your bread slightly stale faster
Refrigeration dries out bread
Shelf life: 5-7 days refrigerated
To refresh: Toast or warm in 350°F oven for 5 minutes
Freezer Storage (Recommended!)
Best for: Long-term storage up to 3 months
How to freeze:
Cool completely to room temperature
Slice before freezing (makes toasting easier)
Label with date
Freeze up to 3 months
To thaw:
Toast from frozen: Best method! start with your normal toasting time and adjust based on personal toasting preference.
Oven: Wrap in foil, bake at 350°F for 5-10 minutes
Room temp: Let sit 1-2 hours to thaw naturally
What temperature should my kitchen be for sourdough?
Ideal room temperature is 68-75°F (20-24°C). Warmer kitchens (above 75°F) speed up fermentation. Cooler kitchens (below 68°F) slow it down. Adjust your fermentation time accordingly.
Can I make this recipe vegan?
Yes! This recipe is already vegan as long as your sourdough starter is maintained with water (not milk or whey). Sourdough contains only flour, water, salt, and wild yeast.
Why did my bread not rise in the oven (no oven spring)?
Common causes:
Dough was still too cold from the fridge
Over-fermented (past its peak)
Dutch oven wasn't hot enough
Insufficient steam
Weak or inactive starter
Troubleshooting Common Sourdough Problems
Problem: My dough is too sticky to handle
Solution: Sourdough should be sticky, but if it's unmanageable, wet your hands instead of flouring them. Adding too much flour during folding will make your bread dense.
Problem: The dough didn't rise much after cold fermentation
Solution: This is normal! Most of the rise happens in the oven (this is known as "oven spring"). As long as your starter was active, the bread will rise dramatically when it hits the heat.
Problem: My crust is too hard
Solution: Reduce baking time slightly, or remove the Dutch oven lid 5 minutes before the end. Store bread in a bread box (not plastic) to soften the crust slightly.
Problem: Gummy, wet crumb inside
Solution: There are a few solutions here. Its either that:
The loaf was under-baked. Try baking 5 minutes longer next time.
Loaf was sliced too early, I recommend the full 2 hours wait time.
Your oven runs hot. Try turning down the oven temperature to 425F next time. Use a thermometer—internal temp should be 200-210°F.
Problem: Bread spread flat instead of rising up
Solution: Insufficient gluten development. Make sure you're doing all 3-4 rounds of stretch and folds, and shaping with proper tension.
Tips for the Best Homemade Sourdough
✓ Use a kitchen scale: Weight measurements give consistent results. Volume measurements (cups) vary wildly depending on how you scoop flour.
✓ Don't skip the stretch and folds: This is what creates the gluten network and airy crumb structure. Each fold strengthens the dough.
✓ Temperature is everything: Keep notes on your kitchen temperature and fermentation times. You'll learn your sourdough's rhythm.
✓ Store cut-side down: Place your sliced loaf cut-side down and wrap in a cotton towel.
✓ Keep a sourdough journal: Track feeding times, fermentation temps, and results. You'll quickly learn what works in your kitchen.
✓ Save your scraps: Sourdough makes excellent breadcrumbs, croutons, or panzanella salad.
Health benefits of sourdough:
Lower glycemic index than regular bread
Easier to digest due to fermentation
Higher bioavailability of minerals
Natural probiotics from fermentation
Related Sourdough Recipes
Once you've mastered this basic sourdough boule and want to explore different variations:
Whole Wheat Sourdough Bread: Substitute 50-100g of all-purpose flour with whole wheat
Spelt Sourdough Bread: Substitute 100-150g of all-purpose flour with spelt flour
Recipe Card
Easy Sourdough Bread Recipe
Yield: 1 loaf | Active Time: 20 min | Total Time: 28-78 hours
Ingredients:
315g Cold Water (1⅓ cups)
200g Active Sourdough Starter (¾ cup)
450g All-Purpose Flour (3½ cups)
12g Kosher Salt (2 tsp)
Instructions:
Mix all ingredients until combined, roughly 3-4 minutes
Rest 30 minutes
Stretch and fold 3-4 times (30 min between each)
Shape into ball, place into a bowl and cover with a cotton tea towel
Refrigerate 24-72 hours
Warm to room temp (30-60 min)
Preheat oven + Dutch oven to 450°F (30 min)
Score dough
Bake covered 24-30 minutes
Cool 1-2 hours before slicing
Did You Make This Recipe?
I’d love to see it! Please leave a ⭐ star rating and comment below to let us know how your sourdough bread boule turned out. Did you make any substitutions or additions? Share your tips and photos with us!
Share this recipe: Help others discover this delicious recipe by sharing it on Pinterest, Facebook, or Instagram. Tag us @Sageandsimplicity so we can see your beautiful creations!
📌 Pin it for later: Save this recipe to your Pinterest boards for easy access.
Foolproof Homemade Sourdough Bagels (Cold Ferment Method)
Have you ever wondered how to make big puffy homemade bagels that are similar to those from the bakery? Look no further! These homemade sourdough bagels are chewy, golden, and full of that classic bakery-style flavour with a NY style texture — made right in your own kitchen! This foolproof 5-ingredient sourdough bagel recipe is super easy. It uses active sourdough starter and simple pantry ingredients to create perfectly flavourful bagels, without commercial yeast. Whether you’re looking for a weekend baking project, a make-ahead breakfast, or a freezer-friendly staple, these sourdough bagels deliver reliable results and authentic texture every time.
As an Amazon Associate I earn from qualifying purchases.
This is simply the Best Sourdough Bagel Recipe (Step-by-Step)
*Last Updated: February 12, 2026
⭐⭐⭐⭐⭐ (4.9/4 based on taste tester reviews)
📖 Jump to Recipe | 💬 Jump to FAQs | 🖨️ Print Recipe
Active Time: 30 minutes | Fermentation: 24-72 hours | Bake: 25 minutes | Yield: 8-10 bagels | Serving Size: 1 bagel | Difficulty: Easy
How to Make Homemade Sourdough Bagels
This is simply the best homemade bagel recipe I've found! Its taken me months of work to develop and perfect this recipe. And after all that trial and error, I’m thrilled to share how to make homemade bagels from scratch (using your sourdough starter)!
What’s the secret to making these with only 5-ingredients? These naturally leavened bagels use no commercial yeast! These 5-ingredients sourdough bagels are simply the real deal: authentically chewy with a shiny, golden crust. They have that complex tangy flavour from 24-48 hours of cold fermentation. That irresistible sourdough tang we all know and love. Best of all, this recipe only requires 30 minutes of hands-on time—the rest is patiently waiting while the flavours develop. The best part, there’s no special equipment required to make these bagels! Find out more in the FAQs. Whether you're a sourdough beginner or experienced baker, you'll love how straightforward and forgiving this recipe is!
Why this recipe works:
No special equipment required (find out more in the FAQs)
Cold fermentation builds incredible flavour (traditional method!)
Just 5 ingredients (no special equipment needed)
30 minutes active time (fits any schedule)
Freezer-friendly (make ahead for weeks of breakfasts)
This recipe doubles and triples easily. Prep once, enjoy for weeks to come! (saves time)
Detailed photos and troubleshooting (foolproof results)
Why I created this recipe
I developed this recipe when I noticed that the bagels from the store had a long list of ingredients, most that I couldn’t recognize or pronounce. Being careful of what I feed my family, I didn’t like the fact that bagels from the store had so many ingredients, oftentimes additives and preservatives. So, I set out to learn how to make homemade bagels! I’ve worked, tested and re-worked this homemade bagel recipe for 6 months before landing on this version, that we simply ADORE!
In all of the variations that I’ve tried and tested these variables:
Different flours (All-purpose vs whole wheat vs blends with spelt vs millet flour and variations)
Boiling times (5 seconds vs 10 seconds vs 20 seconds or more)
Oven temperatures (400°F vs 425°F)
Different shaping methods (poke-and-stretch vs rope method). I can assure you the poke-and-stretch works MUCH better. ;)
When learning how to make bagels, I discovered that the secret is a combination of factors. The type of flour, the right boil time, a preheated oven set at the proper temperature, and the right shaping method. These small variations matter! For example, a 5 second boil time, and my homemade bagels were basically small round bread loaves. I tried increasing the boil time, and they were so tough we had trouble chewing them! I found the sweet spot to be at 10 seconds of boil time per side.
Since perfecting this recipe, these homemade bagels have become mine and my sons breakfast go-to for busy weekday mornings, especially when its a cream cheese bagel topped with sesame seeds. ;)
Perfect for: Weekend baking, meal prep, brunch, gift giving
Why You'll Love These Homemade Sourdough Bagels
✓ Authentic Chewy Texture: Just like bakery bagels with that signature dense, chewy crumb
✓ Incredible Tangy Flavour: Long cold fermentation develops complex sourdough taste
✓ Simple Ingredients: Just 5 basic ingredients you probably have on hand
✓ Flexible Timeline: Make the dough 1-2 days ahead, bake when convenient
✓ No Commercial Yeast: 100% naturally leavened with sourdough starter
✓ Customizable: Add your favorite toppings - everything bagel seasoning, sesame, poppy seeds
✓ Freezer-Friendly: Make a double batch and freeze for quick breakfasts
✓ Healthier Option: Sourdough fermentation makes nutrients more bioavailable and easier to digest
✓ Cost-Effective: Homemade bagels cost pennies compared to bakery prices
✓ Impressive: These look and taste like professional bakery bagels!
When I discovered how to make bagels, I discovered how increadibly satisfying it is to pull a tray of golden, perfectly shaped bagels from my oven. These sourdough bagels combine the best of both worlds: the authentic chewy texture and shiny crust of traditional New York-style bagels with the complex, tangy flavour that only sourdough can provide.
What makes these homemade bagels truly special is the long, cold fermentation period. While the dough rests in your refrigerator for 24-48 hours, the sourdough starter works its magic, developing layers of flavour that you simply can't get from quick recipes. The result is a bagel with depth, character, and that unmistakable sourdough tang that makes every bite memorable.
How to make these homemade sourdough bagels? The process is surprisingly straightforward. Mix the dough, let it ferment in the fridge (perfect for busy schedules!), shape into bagels, give them a quick boil, and bake. That brief boil in water is the secret to achieving that signature shiny, chewy crust that makes bagels so distinctive. Without it, you'd just have round bread - good, but not a true bagel.
These bagels are perfect for weekend baking projects, meal prep for the week ahead, or impressing guests at brunch. Make them plain and simple, or go wild with toppings like everything bagel seasoning, sesame seeds, poppy seeds, or even cinnamon sugar. Slice them fresh from the oven, smear with cream cheese, and you'll understand why homemade bagels are worth every minute of effort.
Whether you're an experienced sourdough baker or just starting your natural fermentation journey, learning how to make bagels is both achievable and rewarding. They freeze beautifully, making them a practical addition to your weekly routine. Once you taste the difference between homemade sourdough bagels and store-bought versions, there's no going back.
Why the Long Fermentation Matters:
The 24-48 hour cold fermentation isn't just for flavour - it actually transforms the bagel:
Breaks down gluten: Makes bagels easier to digest
Develops organic acids: Creates that characteristic sourdough tang
Improves texture: Longer fermentation = better crumb structure
Enhances nutrition: Makes minerals more bioavailable
Natural preservation: Sourdough naturally stays fresh longer
Ingredients for Homemade Sourdough Bagels
Dough Ingredients
1 1/4 cups (300ml) cold water
175g (3/4 cup) active, bubbly sourdough starter - fed 10-12 hours before using
3 tablespoons (40g) granulated sugar - helps with browning and flavour
2 teaspoons (12g) salt - I use kosher salt
3 cups (375g) all-purpose flour - bread flour also works for extra chew
For Boiling
Water - enough to fill a pot halfway
Here are two (optional) variations that can help you achieve the crust you’d like:
Want a shiny crust? Add: **1 tablespoon (15g) sugar or honey** (optional) - adds shine to crust
Dark and shiny crust? Add: **1 tablespoon (18g) baking soda** (optional) - creates darker, shinier crust
Optional Toppings
Everything bagel seasoning
Sesame seeds (white or black)
Poppy seeds
Dried minced onion
Dried minced garlic
Coarse salt
Cinnamon sugar (for sweet bagels)
Sharp cheddar cheese, shredded
Equipment Needed
Stand mixer with dough hook (or kneed by hand)
Large mixing bowl
Cotton tea towel (recommended) or plastic wrap
Bench scraper (Affiliate Link) or sharp knife
Baking sheet
Parchment paper
Medium to large pot for boiling
Slotted spoon or spider strainer
Wire cooling rack (Affiliate link)
Kitchen timer
Digital scale (Affiliate Link) (highly recommended)
Ingredient Notes & Substitutions
Sourdough Starter: Must be active and bubbly! Feed your starter roughly 10-12 hours before making bagels. It should have doubled in size and pass the float test (a spoonful floats in water). If your starter isn't active, your bagels won't rise properly.
Water Temperature: Use cold water, not warm. Cold water slows fermentation, which is what we want since the dough will ferment in the fridge for 24-48 hours.
Sugar: Granulated white sugar is traditional, but you can substitute with honey (use 2 tablespoons) or maple syrup. Sugar feeds the starter, adds flavour, and helps with browning. Don't omit!
Salt: Fine sea salt or table salt work best. Don't use coarse salt as it won't dissolve evenly. Salt strengthens gluten and controls fermentation rate.
Flour: All-purpose flour (10-12% protein) creates classic bagels. For extra chewy bagels, use bread flour (12-14% protein). Can substitute up to 1 cup with whole wheat flour for heartier bagels. Avoid cake or pastry flour (too soft).
Bread Flour vs. All-Purpose:
All-purpose: Softer, more tender bagels (still chewy!)
Bread flour: Extra chewy, denser texture (more traditional)
Can I Make These Gluten-Free? Unfortunately, no. Bagels require high-gluten flour to achieve their signature chewy texture. Gluten-free versions would be entirely different recipes.
How to Make Homemade Sourdough Bagels: Step-by-Step instructions
Step 1: Mix the Dough (10 minutes)
Add ingredients to your stand mixer bowl in this order:
1 1/4 cups cold water
175g active sourdough starter (it should float)
3 tablespoons sugar
2 teaspoons salt
3 cups all-purpose flour
Attach the dough hook to your stand mixer. Mix on low speed (speed 2) for 9 minutes until the dough is smooth, elastic, and pulls away from the sides of the bowl.
What to expect: After 3-4 minutes, you'll notice a dramatic change in texture. The dough will transform from shaggy and rough to smooth and stretchy.
Adjusting consistency:
Too dry/stiff? Add water 1 tablespoon at a time while mixing
Too sticky/wet? Add flour 1 tablespoon at a time while mixing
Perfect dough: Should be tacky but not sticky, smooth and elastic, passes the windowpane test
Don't have a stand mixer? Mix by hand in a large bowl until combined, then knead on a floured surface for 10-12 minutes until smooth and elastic.
Windowpane Test: Pinch off a small piece of dough and gently stretch it. If you can stretch it thin enough to see light through it without tearing, the gluten is properly developed.
Step 2: Cold Fermentation (24-48 hours)
Cover the bowl with a damp cotton tea towel or plastic wrap. Place in the refrigerator.
Fermentation timeline:
Minimum: 24 hours (good flavour, adequate rise)
Optimal: 36-42 hours (best flavour and texture)
Maximum: 48 hours (maximum tang, slightly denser)
What's happening: The cold temperature slows down fermentation dramatically. Your sourdough starter continues working slowly, developing complex flavours and breaking down gluten for better digestibility.
Visual cues: The dough should increase in size by about 50-75%. It won't double like warm-proofed dough, and that's completely normal!
Can I go longer than 48 hours? You can push it to 60-72 hours, but the flavour becomes increasingly sour and the dough may become more difficult to shape.
Step 3: Divide and Pre-Shape homemade bagels (10 minutes)
Remove the dough from the refrigerator. Let it sit at room temperature for 10-15 minutes (makes it easier to work with).
Lightly dust your work surface with flour.
Remove the dough from the fridge and divide:
For 8 regular bagels: Cut into 8 equal pieces (about 115g each)
For 10 smaller bagels: Cut into 10 pieces (about 90g each) - perfect for kids or portion control
How to divide: for 8 bagels
Pat dough into a ball shape
Cut in half with bench scraper
Cut each half in half (now you have 4 pieces)
Cut each quarter in half (now you have 8 pieces)
How to divide: for 10 bagels
Pat dough into a ball shape
Cut in half with a bench scraper
cut each half into 5 equal sized pieces
Shape into balls:
Take one piece of dough
Cup your hand over it on the work surface
Move your hand in small circles, creating tension
The dough will form a smooth, tight ball
Lightly dust each ball with flour
Repeat for all pieces
Rest: Cover shaped balls with a tea towel and let rest on the counter for 30 minutes.
Why this rest matters: This relaxes the gluten, making bagels easier to shape. Skip this and your bagels will spring back and be difficult to form.
Step 4: Shape the homemade Bagels (10 minutes)
After the 30-minute rest, it's time to create that iconic bagel shape!
Poke and Stretch Method
1. Take one dough ball
2. Poke your thumb or index finger straight through the center
3. Insert both thumbs into the hole
4. Gently stretch and rotate the dough, enlarging the hole
5. Keep stretching until the hole is about 2 inches (5cm) in diameter
6. The bagel should look oversized - this is intentional!
Important: Make the hole BIGGER than you think! The hole shrinks significantly during resting, boiling, and baking. If your hole is too small, it will close back up.
After shaping all bagels:
Place shaped bagels on a lightly floured surface
Cover with tea towel
Rest for 30 minutes at room temperature
What you'll see: The bagels will puff up slightly and the holes will shrink a bit. This is normal!
Pro tip: If the dough is springing back too much, let it rest another 10-15 minutes before trying again.
Step 5: Preheat Oven (While Bagels Rest)
While the shaped bagels rest for 30 minutes, preheat your oven to 425°F (220°C).
Position the oven rack in the center of the oven for even baking.
Line a large baking sheet (or two smaller ones) with parchment paper. Set aside.
Why preheat now? Timing is everything! Your oven needs to be fully hot when the bagels are ready to bake right after boiling.
Step 6: Boil the Bagels (5 minutes)
Fill a medium to large pot halfway with water. Bring to a rolling boil over high heat. When developing and testing this recipe, I learned that boil time is crucial when learning how to make bagels.
Optional additions to boiling water:
1 tablespoon brown sugar or honey (adds shine and slight sweetness). Adding these will add lots of sweetness to the bagels.
1 tablespoon baking soda (creates darker, shinier, more pretzel-like crust)
Boiling process:
Gently lower 1-2 bagels into the boiling water (don't overcrowd)
Boil for 10 seconds - the bagel should float immediately
Using a slotted spoon, flip the bagel over
Boil the second side for 10 seconds
Remove with slotted spoon, letting excess water drain
Place on parchment-lined baking sheet
Repeat with remaining bagels
Important timing notes:
Don't skip boiling! This step is what makes a bagel a bagel, not just round bread
10 seconds per side = chewy crust, softer interior (highly recommended)
30 seconds per side = very chewy, dense crust
Troubleshooting boiling:
Bagel sinks: Dough is underproofed or overworked - still bake it, but next time let ferment longer
Bagel falls apart: Too much flour on surface - use less flour when shaping
Hole closes: Make hole bigger next time during shaping
Step 7: Add Toppings (2 minutes)
Right after boiling, while still wet, is the perfect time to add toppings! The moisture helps toppings stick.
Classic topping options:
Everything bagel seasoning (most popular!)
Sesame seeds (toast first for extra flavour)
Poppy seeds
Coarse sea salt
Dried minced onion
Dried minced garlic
Combination of above
Sweet topping options:
Cinnamon sugar
Coarse sugar
To apply toppings:
Place toppings in a shallow bowl or plate
Immediately after boiling, while bagel is still wet, press the top into the topping
Or sprinkle toppings generously on top
Place on baking sheet topping-side up
How much topping? Don't be shy! Use more than you think - some will fall off during baking and transferring to a storage container.
Want plain bagels? Skip the toppings and bake as-is.
Step 8: Bake (20-25 minutes)
Place the baking sheet in the preheated 425°F (220°C) oven.
Bake for 20-25 minutes until the bagels are deep golden brown.
How to tell they're done:
Deep golden brown colour on top and sides
Toppings are toasted (but not burned)
The smell is incredible!
Sound hollow when tapped on the bottom
Timing guide:
20 minutes: Lighter golden colour, softer texture
23 minutes: Classic golden brown (recommended)
25 minutes: Deep golden, extra crispy crust
Oven differences: Every oven varies! Start checking at 20 minutes and add time as needed.
Rotate halfway? For even browning, rotate the baking sheet 180° at the 12-minute mark.
Multiple trays? Bake one tray at a time for best results, or switch positions halfway through if baking two trays.
Step 9: Cool (10-15 minutes)
Remove bagels from the oven. The smell will be incredible!
Let them cool on the baking sheet for 5 minutes - they're delicate when hot.
After 5 minutes, transfer bagels to a wire cooling rack. Let cool for at least another 10 minutes before slicing.
Can you eat them warm? Absolutely! Warm bagels are amazing. But let them cool at least 10-15 minutes so the interior sets properly.
Slicing tip: Use a serrated bread knife and cut with a gentle sawing motion to avoid squashing the bagel.
Listen for the crackle: As bagels cool, you might hear the crust crackling. This is the sound of perfectly baked bagels!
Tips for Perfect Homemade Sourdough Bagels
🥯 Use Active Starter: Your starter MUST be bubbly and active. If it's sluggish, your bagels won't rise. Feed your starter 10-12 hours before mixing dough and make sure it passes the float test.
⚖️ Weigh Your Ingredients: Use a kitchen scale for accuracy. Flour measurements can vary by 30g or more depending on how you scoop, which drastically affects dough consistency.
❄️ Cold Fermentation is Key: Don't rush this step! The 24-48 hour cold ferment develops flavour and improves texture. It's what makes these bagels special.
🕳️ Make Holes BIG: The hole should be 2 inches (5cm) in diameter when shaped. It will shrink significantly during resting, boiling, and baking. Too small and it closes completely!
💧 Don't Over-Boil: Just 10 seconds per side! Longer boiling = denser, chewier bagels
🌡️ Accurate Oven Temp: Use an oven thermometer. If your oven runs hot or cold, your bagels will overbake or underbake.
🧂 Season Generously: Use more toppings than you think! Some will fall off during baking. Press toppings gently into the wet surface after boiling.
⏰ Time the Process: Have your water boiling and oven preheated BEFORE you start boiling. Work quickly so bagels go from boiling to oven without delay.
📝 Keep Notes: Write down fermentation times and temperatures. Sourdough timing varies with kitchen temp and starter strength.
🧊 Freeze for Later: These freeze beautifully! Slice before freezing for easy toasting straight from frozen.
Frequently Asked Questions: How to make bagels
How many homemade bagels does this recipe make?
This recipe makes 8 regular-sized bagels or 10 smaller bagels (perfect for kids or portion control).
Each regular bagel weighs approximately 115g before baking. Smaller bagels weigh about 90g each.
Can I make homemade sourdough bagels without a stand mixer?
Yes! You can absolutely make these by hand:
Mix all ingredients in a large bowl with a wooden spoon until combined
Turn out onto a lightly floured surface
Knead by hand for 10-12 minutes until smooth, elastic, and passes the windowpane test. Your hands may get tired, but the result is just as good!
The stand mixer just makes the kneading easier and more consistent.
How long do I need to cold ferment sourdough bagels?
Minimum: 24 hours
Optimal: 36-42 hours
Maximum: 48 hours (up to 72 hours for very tangy bagels)
The longer the cold ferment, the:
More complex the flavour
More sour the taste
Easier the dough is to digest
Better the texture
Most bakers find 36-42 hours to be the sweet spot for flavour and texture.
Do sourdough bagels need to be boiled?
Yes - this step is essential! Boiling is what makes a bagel a bagel, not just round bread.
What boiling does:
Creates the signature shiny, chewy crust
This process gelatinizes the starches on the surface of the dough, giving bagels their distinctive crust texture
Sets the shape so bagels don't spread in the oven
Creates that distinct bagel texture
Without boiling, you'll have soft rolls with holes - not true bagels.
Why are my sourdough bagels dense?
Dense bagels are usually caused by:
Inactive starter: Starter wasn't bubbly and active before mixing
Under-fermented: Didn't ferment long enough (need minimum 24 hours)
Too much flour: Added too much during mixing or shaping
Over-boiled: Boiled longer than 10 seconds per side
Old flour: Using old flour with weak gluten
Solution: Make sure your starter is very active, ferment the full 24+ hours, and measure flour accurately.
Can I make sourdough bagels without sugar?
You can reduce the sugar, but don't omit it completely. Sugar serves several purposes:
Feeds the sourdough starter
Helps with browning in the oven
Balances the sour flavour
Contributes to texture
You can: Reduce to 1-2 tablespoons (from 3 tablespoons)
Don't: Omit entirely or bagels will be pale and very sour
Alternative: Replace sugar with 2 tablespoons honey or maple syrup.
How do I know when my sourdough starter is ready to use?
Your sourdough starter is ready when:
✓ Doubled or tripled in size since last feeding (4-12 hours ago)
✓ Full of bubbles throughout (not just on top)
✓ Passes the float test: Drop a spoonful in water - it should float
✓ Smells pleasantly sour and slightly yeasty (not like acetone or nail polish remover)
✓ Has a domed top with webbing when you look at the side of the jar
If your starter is sluggish, feed it and wait until it's at peak activity before making bagels.
Pro Tip: If your sourdough starter is weak and hasn’t been fed in a while, and want the best results possible? Feed it every 24 hours for 3-4 days before using it, making sure to leave it on the counter (don’t put tin the fridge). Feeding it regularly will increase its strength and improve your baking results.
What temperature should the water be for sourdough bagels?
Use cold water (straight from the tap, around 60-70°F/15-21°C).
Why cold water?
Slows fermentation during mixing
Prevents dough from fermenting too fast before refrigeration
Easier to control the fermentation timeline
Don't use warm water like you would for commercial yeast dough. The cold fermentation will do all the work!
Can I freeze sourdough bagels?
Absolutely! Sourdough bagels freeze beautifully for up to 3 months.
To freeze:
Cool bagels completely to room temperature
Slice the bagels before freezing (makes toasting easier)
Place in freezer bags, removing as much air as possible
Label with date
Freeze
To thaw and serve:
Toaster: Toast pre-cut bagels directly from frozen (add 1-2 minutes to normal time)
Oven: Wrap in foil, heat at 350°F for about 10 minutes
Room temp: Leave out 1-2 hours to thaw naturally
Pro tip: Freeze bagels individually first on a baking sheet, then transfer to bags. This prevents them from sticking together.
How long do sourdough bagels stay fresh?
Room temperature: 2-3 days in a paper bag or bread box
Refrigerator: 5-7 days in an airtight container (can make them slightly stale)
Freezer: 3 months in freezer bags
Best storage method:
Day 1-2: Room temperature in a bread box
Day 3+: Slice and freeze any you won't eat within 2 days
To refresh stale bagels:
Toast or heat in 350°F oven for 5 minutes. They'll taste freshly baked again!
What's the best flour for sourdough bagels?
Best options:
All-Purpose Flour (10-12% protein) - Creates classic chewy bagels with tender interior. Most accessible option.
Bread Flour (12-14% protein) - Creates extra chewy, denser bagels. More traditional New York-style texture.
Combination: 2 cups bread flour + 1 cup all-purpose for a middle ground
Don't use:
Cake flour or pastry flour (too soft, won't hold shape)
100% whole wheat (too dense and heavy)
Can use: Up to 1 cup whole wheat flour + 2 cups all-purpose for heartier bagels.
Why do I need to boil bagels before baking?
Boiling is the secret to authentic bagels! Here's what it does:
Creates the crust:
Forms that characteristic shiny, chewy exterior
Prevents bagels from spreading in the oven
Sets the texture:
Inside stays soft and chewy
Outside becomes dense and glossy
Creates the distinctive bagel "bite"
Without boiling: You'd have soft rolls with holes - not true bagels!
Fun fact: Montreal bagels are boiled in honey water, New York bagels in plain water or water with malt syrup.
Can I make sourdough bagels the same day?
It's possible but not recommended. The 24-48 hour cold ferment is what makes these bagels special!
If you must make same-day:
Use very active starter
Let dough ferment at room temp 6-8 hours until doubled
Shape and rest 30 minutes
Boil and bake as directed
Downsides:
Less developed flavour (won't taste as complex)
Less tangy (minimal sourdough flavour)
Potentially tougher texture
Misses the whole point of sourdough bagels!
Better option: Plan ahead! Mix dough Thursday, bake Saturday.
What if my bagel dough is too sticky?
During mixing:
- Add flour 1 tablespoon at a time until dough pulls away from bowl
- Bagel dough should be tacky but not sticky
- It should be firmer than bread dough
During shaping:
Dust work surface lightly with flour
Use just enough flour to prevent sticking
Too much flour makes dry, pale bagels
After refrigeration:
Let cold dough rest 10-15 minutes at room temp
It will be easier to handle when slightly warm
Is it too wet? Add 2-4 tablespoons flour total. Don't add too much or bagels will be dense.
Can I add ingredients like cheese or jalapeños to the dough?
Yes! You can add mix-ins, but timing matters:
Best method:
Add mix-ins during the last 1-2 minutes of mixing
Knead just until distributed
Good mix-ins:
Sharp cheddar cheese, shredded (1 cup)
Diced jalapeños (1/2 cup)
Dried cranberries (1/2 cup)
Chopped olives (1/2 cup)
Herbs (2 tablespoons dried or 1/4 cup fresh)
Don't add:
Very wet ingredients (will make dough too sticky)
Too many mix-ins (more than 1 cup total)
Note: Mix-ins can interfere with shaping and may fall out during boiling.
Why didn't my bagels rise during fermentation?
Common causes:
Inactive starter: Wasn't bubbly and active when you mixed the dough
Starter ratio too low: 175g may not be enough for some starters - try 200-225g
Too cold: Refrigerator was below 35°F - dough barely ferments
Not enough time: Give it the full 24-48 hours
Too much salt: Salt can inhibit fermentation
Solution: Make sure starter is at peak activity. Sourdough rises slower than commercial yeast - be patient!
Note: Cold-fermented dough only rises 50-75%, not double. This is normal!
What toppings work best on sourdough bagels?
Most Popular:
Everything bagel seasoning (sesame, poppy, onion, garlic, salt)
Sesame seeds (white, black, or mixed)
Poppy seeds
Coarse sea salt
Dried onion flakes
Dried granular garlic
Sweet options:
Cinnamon sugar
Coarse sugar
How to make toppings stick:
Apply right after boiling while bagels are still wet
Press toppings gently into surface
Use more than you think - some will fall off
Can I make sourdough bagels vegan?
Good news: This recipe is already vegan!
It contains:
Water
Sourdough starter (just flour and water)
Sugar
Salt
Flour
No eggs, dairy, or animal products.
Optional egg wash: Some recipes brush with egg wash for shine, but this isn't included in this recipe.
Do I have to use a dough hook or can I use the paddle attachment?
Only use the dough hook! Don’t use the paddle attachment
Why?:
Dough hook kneads and develops gluten properly
Paddle attachment just mixes - doesn't knead
Bagel dough is too stiff for the paddle
You risk damaging your mixer with the paddle on stiff dough
If you only have a paddle:
Mix until combined with paddle
Finish kneading by hand for 8-10 minutes
How do I reheat frozen bagels?
Best methods:
Toaster (easiest):
Slice bagels before freezing
Toast directly from frozen
Add 1-2 minutes to normal toasting time
Oven (best for whole bagels):**
- Wrap frozen bagel in foil
- Bake at 350°F (175°C) for 10-15 minutes
- Unwrap for last 2-3 minutes to crisp up
Microwave (I use this method all the time):
Microwave the whole (uncut) bagel for 20 seconds
Slice bagel with a serrated knife over a cutting board
Toast as you normally would
What's the difference between New York and Montreal-style bagels?
New York-Style (Similar to this Recipe):
Boiled in plain water or water with malt
Baked at moderate temp (425°F)
Larger, softer, fluffier
Topped with various seeds
Served with cream cheese
Montreal-Style:
Boiled in honey-sweetened water
Baked in wood-fired ovens
Smaller, denser, sweeter
Always hand-rolled with a hole
Crispy exterior, chewy interior
This recipe is closer to New York-style but with sourdough tang!
Can I use discard starter instead of active starter?
Not recommended. Bagels need the leavening power of active starter to rise properly.
Why active starter is better:
Contains live, active yeast
Provides leavening power
Creates better texture
Develops proper flavour
If you must use discard:
Use double the amount (350g instead of 175g)
Reduce water by 1/4 cup
Expect denser, less risen bagels
Ferment at room temp 8-12 hours, then refrigerate
Better option: Feed your discard 10-12 hours before making bagels so it becomes active!
Why are my bagels flat instead of puffy?
Common causes:
Over-fermented: Left in fridge too long (more than 72 hours)
Dough too wet: Added too much water during mixing
Holes too big: Over-stretched during shaping
Not enough gluten development: Didn't mix long enough (need full 9+ minutes)
Weak starter: Starter wasn't active enough
Solutions:
Don't ferment more than 48 hours for best rise
Make holes 2 inches but not bigger
Mix full 9 minutes to develop gluten
Use very active, bubbly starter
How do I prevent the hole from closing during baking?
This is the most common bagel problem!
Solutions:
1. Make holes BIGGER: 2-2.5 inches in diameter when shaping (they shrink 50%!)
2. Don't over-proof: After shaping, only rest 30 minutes
3. Boil properly: Full rolling boil, 10 seconds per side
4. Don't add too much flour: Excess flour makes dough tight and shrink-prone
5. Shape consistently: Use the poke-and-stretch method for even holes
Pro tip: After shaping, if holes look too small, gently stretch them again after the 30-minute rest.
How to make bagels: Troubleshooting Common Problems when making Homemade Bagels
Problem: Bagels are too dense and heavy
Causes & Solutions:
✗ Inactive starter → Use very active, bubbly starter at peak
✗ Under-fermented → Ferment minimum 24 hours, up to 48
✗ Too much flour → Weigh ingredients or use spoon-and-level method
✗ Over-boiled → Boil only 10 seconds per side, not longer
✗ Insufficient kneading → Mix full 9 minutes to develop gluten
Perfect bagels are chewy but not brick-like!
Problem: Bagels didn't rise much
Causes & Solutions:
✗ Weak starter → Feed starter and wait until doubled before using
✗ Too cold → Refrigerator temp below 35°F slows fermentation too much
✗ Not enough starter → Try using 200g instead of 175g
✗ Too much salt → Salt inhibits yeast - measure carefully
Note: Cold-fermented dough rises slower than room-temp dough. 50-75% increase is normal!
Problem: Bagels are pale and won't brown
Causes & Solutions:
✗ No sugar → Sugar helps with browning - don't omit
✗ Oven temp too low → Use oven thermometer to verify 425°F
✗ Under-baked → Bake full 20-25 minutes until deep golden
✗ Not enough sugar in boiling water → Add 1 tbsp sugar or honey
Perfect colour: Deep golden brown, not pale yellow or white
Problem: Bagels spread flat in the oven
Causes & Solutions:
✗ **Skipped boiling** → Must boil before baking!
✗ **Dough too wet** → Add more flour during mixing
✗ **Over-fermented** → Don't exceed 48-72 hours in fridge
✗ **Not enough gluten** → Mix full 9 minutes
Boiling sets the shape - never skip this step!
Problem: Toppings fell off during baking
Causes & Solutions:
✗ **Applied to dry bagel** → Apply toppings immediately after boiling while wet
✗ **Not enough topping** → Use generous amounts
✗ **Didn't press in** → Gently press toppings into wet surface
Timing is everything: Top right after boiling!
Problem: Bagels stuck to parchment paper
Causes & Solutions:
✗ **Too much moisture** → Let cool 5 minutes before trying to remove
✗ **Parchment too old** → Use fresh parchment paper
✗ **Cheese/sugar leaked** → Clean any drips from parchment
Tip: Use good quality parchment and don't rush cooling
Problem: Holes closed completely during baking
Causes & Solutions:
✗ **Holes too small** → Make holes 2+ inches when shaping
✗ **Over-proofed** → Only rest 30 minutes after shaping
✗ **Dough too tight** → Let dough relax longer between shaping
Remember: Holes shrink 50%+ during resting, boiling, and baking!
Problem: Bagels are tough and chewy (too much)
Causes & Solutions:
✗ Boiled too long → Stick to 10 seconds per side
✗ Too much bread flour → Use all-purpose or mix 50/50
✗ Over-baked → Reduce baking time slightly
✗ Too much kneading → Mix just 9 minutes, not longer
Goal: Chewy but tender, not rubber!
Recipe Variations
Everything Bagels
Most popular variation!
Topping mixture:
2 tablespoons sesame seeds
1 tablespoon poppy seeds
1 tablespoon dried minced onion
1 tablespoon dried minced garlic
1 tablespoon coarse salt
Mix all ingredients. Press freshly boiled bagels into mixture before baking, or sprinkle it on top of the freshly boiled bagels.
Cinnamon Raisin Bagels
Add to dough during last minute of mixing:
1 cup raisins
2 teaspoons cinnamon
Top with cinnamon sugar after boiling (2 tablespoons sugar + 1 teaspoon cinnamon).
Cheese Bagels
Add during last minute of mixing:
1 cup shredded sharp cheddar cheese
Or sprinkle shredded cheese on top after boiling.
Note: Cheese can leak during boiling and baking - this is normal!
Jalapeño Cheddar Bagels
Add during last minute of mixing:
1/2 cup diced pickled jalapeños (drained well and pat dry with a paper towel)
3/4 cup shredded cheddar cheese
Whole Wheat Sourdough Bagels
Replace 1 cup all-purpose flour with 1 cup whole wheat flour (use 2 cups all-purpose + 1 cup whole wheat).
Adjustments:
Add 2 tablespoons extra water
Expect denser, heartier texture
Fermentation: Whole wheat flour contains more nutrients, minerals, and enzymes (from the bran and germ) that feed yeast and bacteria. This leads to a faster fermentation. Because of this, the whole wheat doughs can over-proof quickly (yikes!). I recommend a shorter fermentation time. The exact time will be temperature dependant.
Mini Bagels
Cut dough into 12-16 pieces instead of 8-10.
Adjustments:
Make smaller balls and holes
Boil 8 seconds per side (instead of 10)
Bake 15-18 minutes (instead of 20-25)
Perfect for kids or appetizers!
Storage & Freezing Guide
Room Temperature Storage
Best for: Eating within 2-3 days
Store in:
Paper bag or bread box (allows some air circulation)
Loosely closed plastic bag (do NOT sealed tight)
Don't store in: Airtight container at room temp (creates moisture and makes bagels soggy. This environment also favours mold development)
Shelf life: 2-3 days at room temperature
Refrigerator Storage
Best for: Extending freshness to 5-7 days
Store in:
Airtight container or sealed plastic bag
Slice first for easy toasting
Downsides:
Can make bagels slightly stale faster
Refrigeration dries out bread
Shelf life: 5-7 days refrigerated
To refresh: Toast or warm in 350°F oven for 5 minutes
Freezer Storage (Recommended!)
Best for: Long-term storage up to 3 months
How to freeze:
Cool completely to room temperature
Slice before freezing (makes toasting easier)
Wrap options:
Individual: Wrap each half in plastic wrap
Batch: Place in freezer-safe bags with air removed
Label with date
Freeze up to 3 months
To thaw:
Toast from frozen: Best method! start with your normal toasting time and adjust based on personal toasting preference.
Oven: Wrap in foil, bake at 350°F for 5-10 minutes
Room temp: Let sit 1-2 hours to thaw naturally
Microwave: 20 seconds- max! The bagel will be hard if microwaved for more than 20 seconds
Pro tip: Flash freeze bagels on a baking sheet first (1 hour), then transfer to bags. This prevents them from sticking together.
Serving Suggestions
Classic Combinations
Traditional:
Plain cream cheese
Lox (smoked salmon), cream cheese, capers, red onion
Butter
Savoury:
Avocado, tomato, everything seasoning
Egg and cheese
Peanut butter or almond butter
Hummus and vegetables
Turkey, Swiss, lettuce, tomato
Sweet:
Cream cheese and jam
Cream cheese and honey
Honey
Butter
Nutella
Cinnamon cream cheese
Bagel Sandwich Ideas
Breakfast Sandwich: Fried egg, bacon, cheese, avocado
Lox Bagel: Cream cheese, smoked salmon, capers, red onion, dill
Veggie Bagel: Hummus, cucumber, tomato, sprouts, avocado
Turkey Club: Turkey, bacon, lettuce, tomato, mayo
Pizza Bagel: Marinara, mozzarella, pepperoni (toast until melted)
Why This Homemade Sourdough Bagel Recipe Works
The Science Behind Perfect Bagels: How to Make Sourdough Bagels
Cold Fermentation = Superior Flavour:
The 24-48 hour refrigeration allows beneficial bacteria to break down complex carbohydrates and develop organic acids. This creates the characteristic sourdough tang while also making the bagels easier to digest.
9-Minute Kneading = Perfect Texture:
This specific kneading time develops just the right amount of gluten. Too little and bagels fall apart; too much and they're tough. Nine minutes creates that perfect chewy-but-tender texture.
Brief Boiling = Signature Crust:
The 10-second boil gelatinizes the starches on the surface, creating a barrier that prevents spreading in the oven. This is what gives bagels their distinctive shiny, chewy crust and dense interior.
High Heat Baking = Golden Crust:
425°F is hot enough to create a deep golden crust without drying out the interior. Lower temps result in pale, soft bagels; higher temps burn the outside before cooking the inside.
Active Starter = Proper Rise:
Unlike commercial yeast which rises quickly, sourdough starter rises slowly and steadily. This creates better flavour development and superior texture.
Sugar Addition = Better Results:
Sugar feeds the starter, helps with browning (Maillard reaction), and balances the sour flavour. It's essential even though traditional bagels are only slightly sweet.
Proposed Sourdough Bagel Timeline
Thursday Morning:
Feed starter, leaving it on the counter until the evening (roughly 10-12 hours). This will activate your starter. Keep an eye on it because the room temperature will impact when the started will be active and ready to use.
Thursday Evening (5-10 minutes):
Mix dough
Cover and refrigerate
Friday - Saturday (Do nothing!):
Dough ferments in fridge
Flavours develop
Sunday Morning (1 hour active time):
Remove from fridge: 10 minutes
Divide and pre-shape: 10 minutes
Rest: 30 minutes
Shape bagels: 10 minutes
Rest: 30 minutes
Preheat oven: during the second rest time
Boil: 5-10 minutes
Bake: 20-25 minutes
Cool: 10-15 minutes
Total active time: About 1 hour
Total elapsed time: 2.5-3 days (mostly hands-off!)
When to Make These Sourdough Bagels
Perfect for:
✓ Weekend Brunch: Impress guests with fresh bagels and lox
✓ Meal Prep Sunday: Bake and freeze for the week
✓ Special Breakfast: Birthday mornings, Mother's Day, holidays
✓ Gift Giving: Bag up a few with cream cheese as a gift
✓ Using Up Starter: Great way to use active starter
✓ Camping/Vacations: Make ahead, freeze, bring for easy breakfasts
✓ Brunch Parties: Bagel bar with various spreads and toppings
✓ Any Time: These are good year-round!
Best Seasons:
Year-round! Bagels don't have a season
Especially satisfying on cold mornings with hot coffee
More Sourdough Recipes
If you loved these sourdough bagels, try:
Sourdough Bread Boule
Recipe Card
Easy Sourdough Bagels Recipe
Yield: 8 bagels | Active: 30 min | Ferment: 24-48 hrs | Bake: 25 min
INGREDIENTS:
1 1/4 cups (300ml) cold water
175g (3/4 cup) active sourdough starter
3 tablespoons (40g) sugar
2 teaspoons (12g) salt
3 cups (375g) all-purpose flour
INSTRUCTIONS:
Mix all ingredients with dough hook on low 9 minutes until elastic
Cover and refrigerate 24-48 hours
Divide into 8 pieces, shape into balls, rest 30 minutes
Poke holes in center, stretch to 2 inches, rest 30 minutes
Preheat oven to 425°F
Boil bagels 10 seconds per side
Add toppings while wet
Bake 20-25 minutes until golden
Cool 10 minutes
STORAGE: Freeze up to 3 months
Did You Make This Recipe?
I’d love to see it! Please leave a ⭐ star rating and comment below to let us know how your sourdough bagels turned out. Did you make any substitutions or additions? Share your tips and photos with us!
Share this recipe: Help others discover this delicious recipe by sharing it on Pinterest, Facebook, or Instagram. Tag us @Sageandsimplicity so we can see your beautiful creations!
📌 Pin it for later: Save this recipe to your Pinterest boards for easy access.